
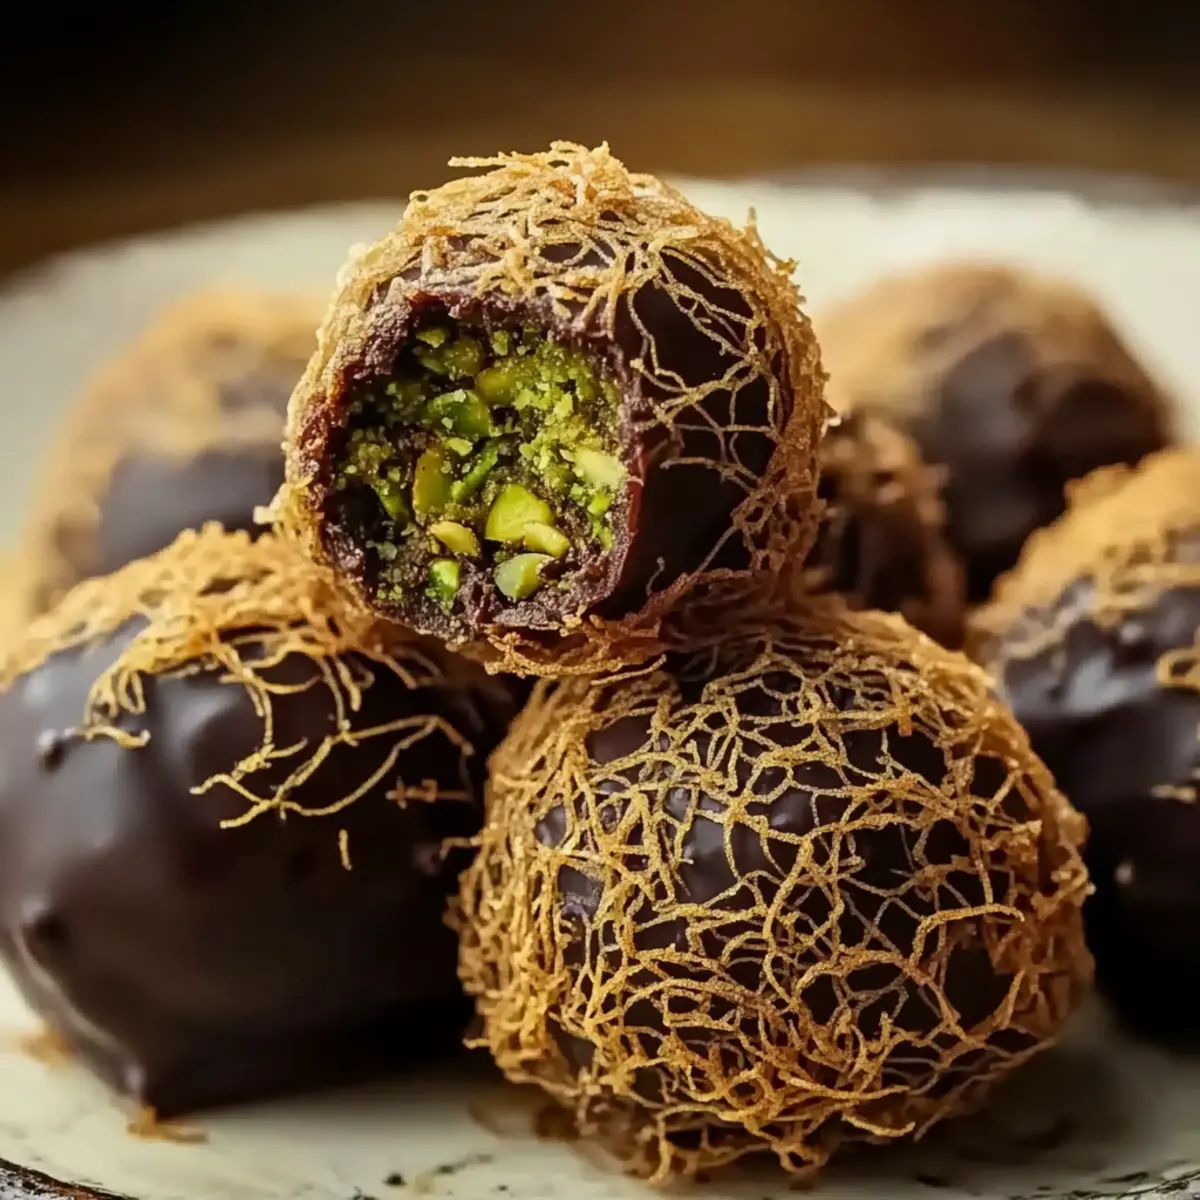
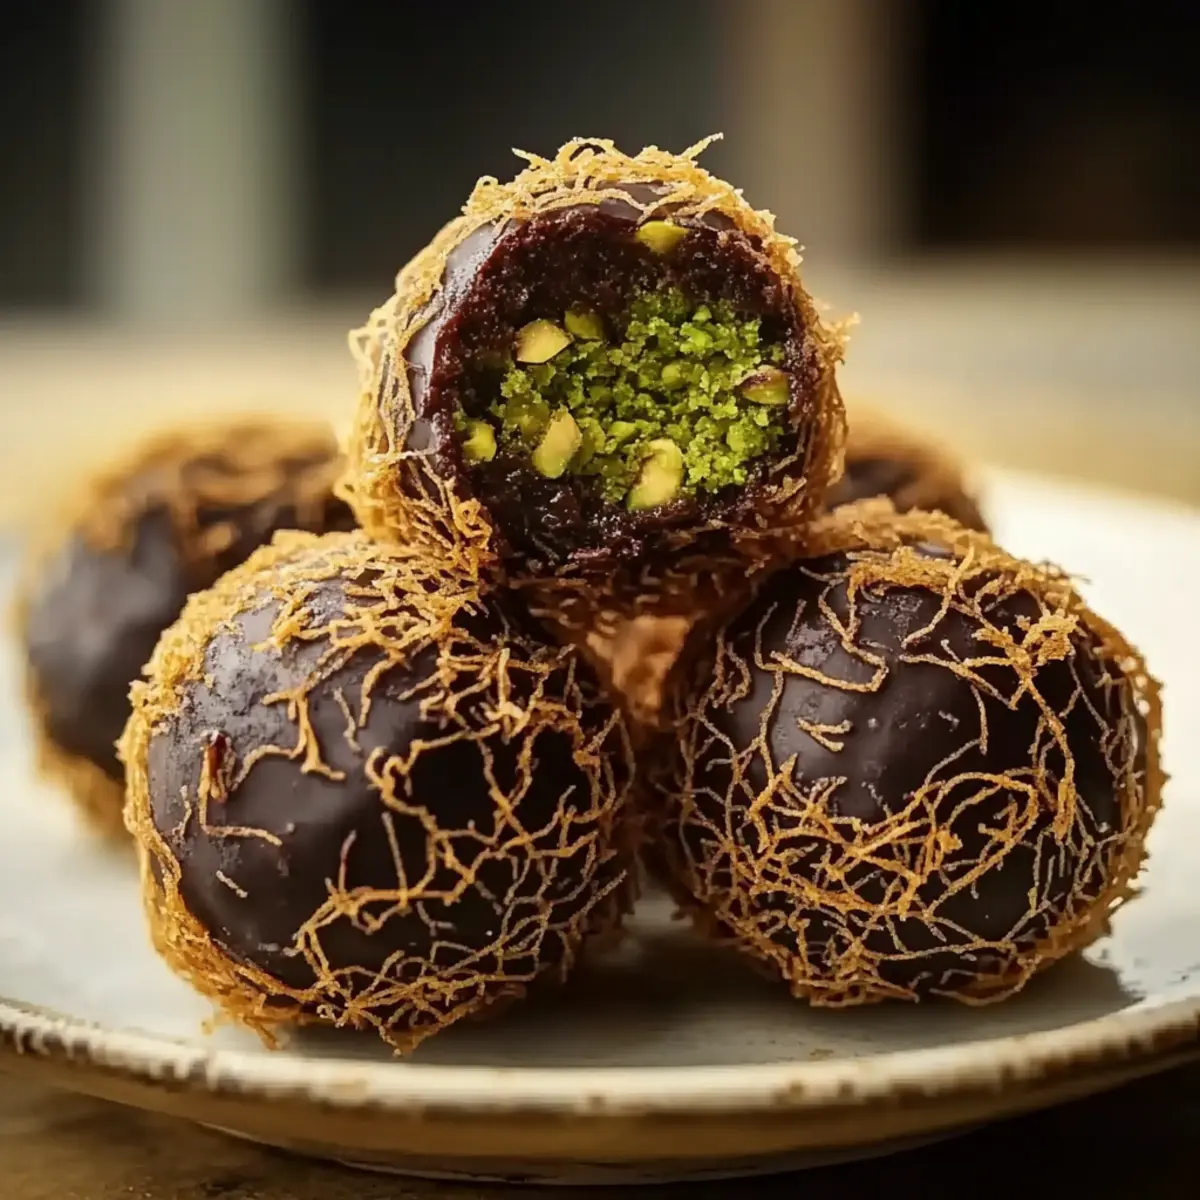
As I pulled open the doors of a bustling Middle Eastern bakery, the intoxicating aroma of sweet treats wrapped in the warm embrace of cardamom and rosewater wrapped around me like a cozy blanket. Those unforgettable flavors inspired me to recreate something special at home: Luxurious Dubai Chocolate Balls with Pistachio and Kataifi. This recipe captures the essence of indulgence while being remarkably easy to prepare, making it a delightful choice for everything from festive gatherings to heartfelt gifts. With a satisfying crunch from the kataifi and a creamy pistachio filling, these chocolate balls promise to elevate any dessert spread. Plus, they can easily accommodate various dietary preferences, whether you’re aiming for vegan or gluten-free options. Wouldn’t it be amazing to impress your friends and family with these stunning treats?
Why Are These Chocolate Balls Special?
Luxurious Taste: Each bite bursts with rich flavors, combining crispy kataifi and creamy pistachio to elevate your dessert experience.
Versatile Options: With substitutions for dietary needs, you can easily adapt this recipe for vegan or gluten-free enjoyment.
Simple Preparation: No advanced skills required—perfect for home cooks looking to impress without the stress!
Crowd-Pleasing Delight: These chocolate balls are sure to be the star of your next gathering, suitable for any occasion.
Perfect for Gifting: Their stunning presentation makes them an excellent choice for thoughtful homemade gifts, just like the enchanting treats at a Middle Eastern bakery.
Impressed your guests with these luxurious Dubai chocolate balls? You might also enjoy making Double Chocolate Peppermint cookies or exploring the refreshing flavors of White Chocolate Orange truffles!
Chocolate Balls Ingredients
For the Kataifi Base
• Kataifi Pastry (7 ounces) – Provides a delightful crunch; you can substitute with finely chopped toasted phyllo pastry for a similar texture.
• Butter (⅓ cup) – Adds richness and helps the kataifi crisp up; opt for unsalted butter to control the flavor.
For the Pistachio Filling
• White Chocolate (5.3 ounces) – Sweetens and binds the filling; feel free to replace with dark chocolate for a richer taste.
• Natural Pistachio Butter (5.3 ounces) – Essential for that authentic flavor; always choose high-quality pistachios with minimal additives.
• Salt (1 pinch) – Enhances the pistachio flavor; using flaky sea salt can elevate the overall taste.
• Neutral Vegetable Oil (1.5 teaspoons, optional) – Helps achieve the right consistency in the filling if it’s too thick.
For the Chocolate Coating
• Dark Chocolate (14.1 ounces, 55-65% cocoa) – Coats the chocolate balls for an enriching depth; ensure you’re using proper cocoa content for balance.
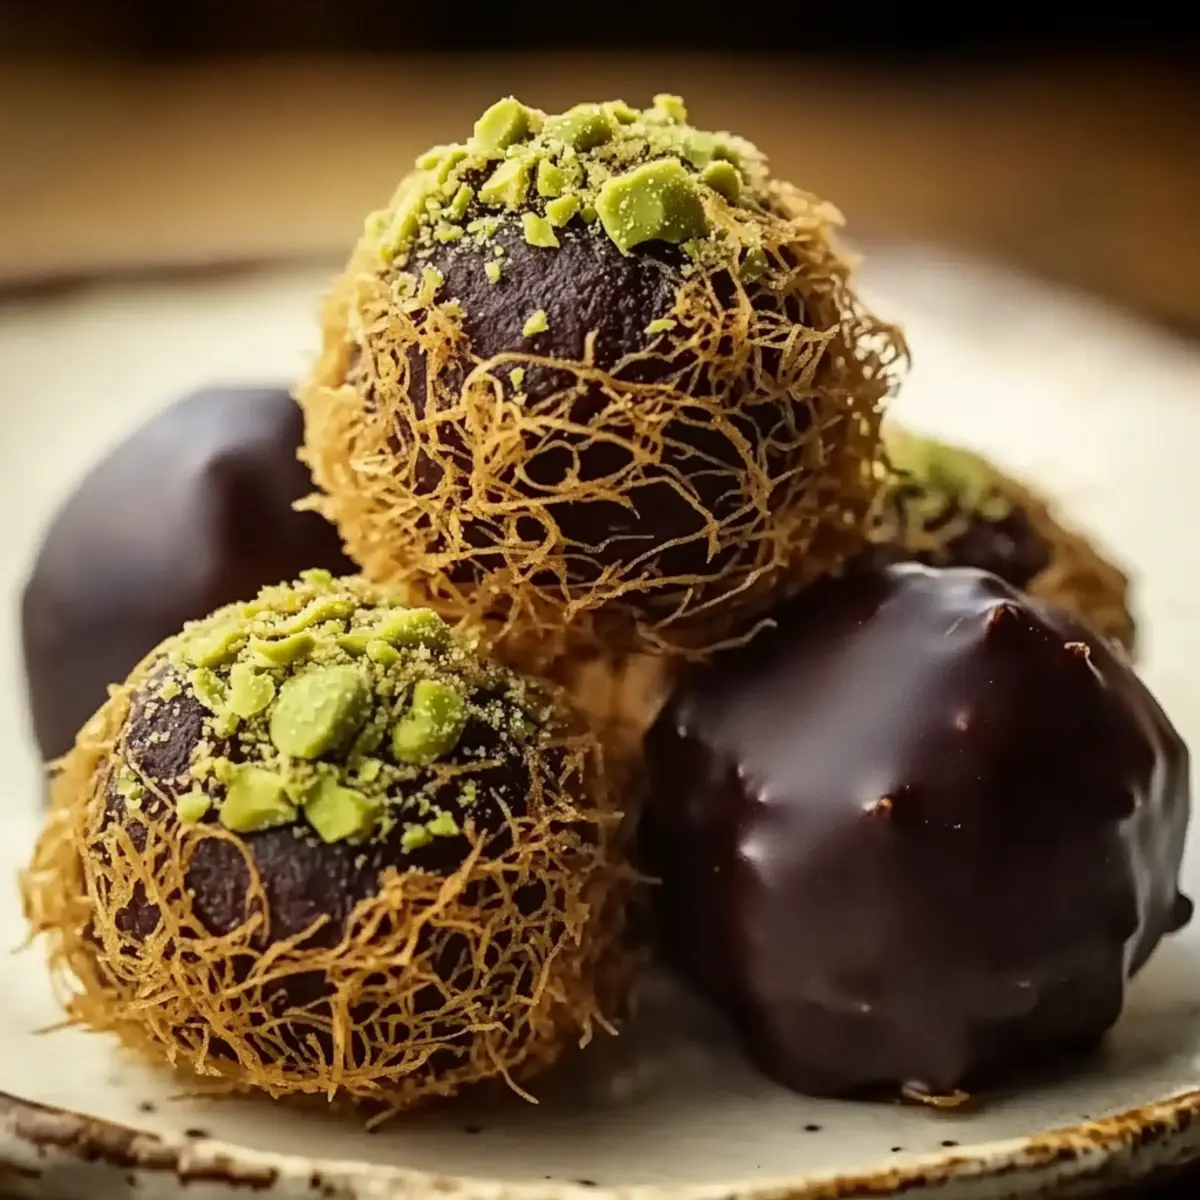
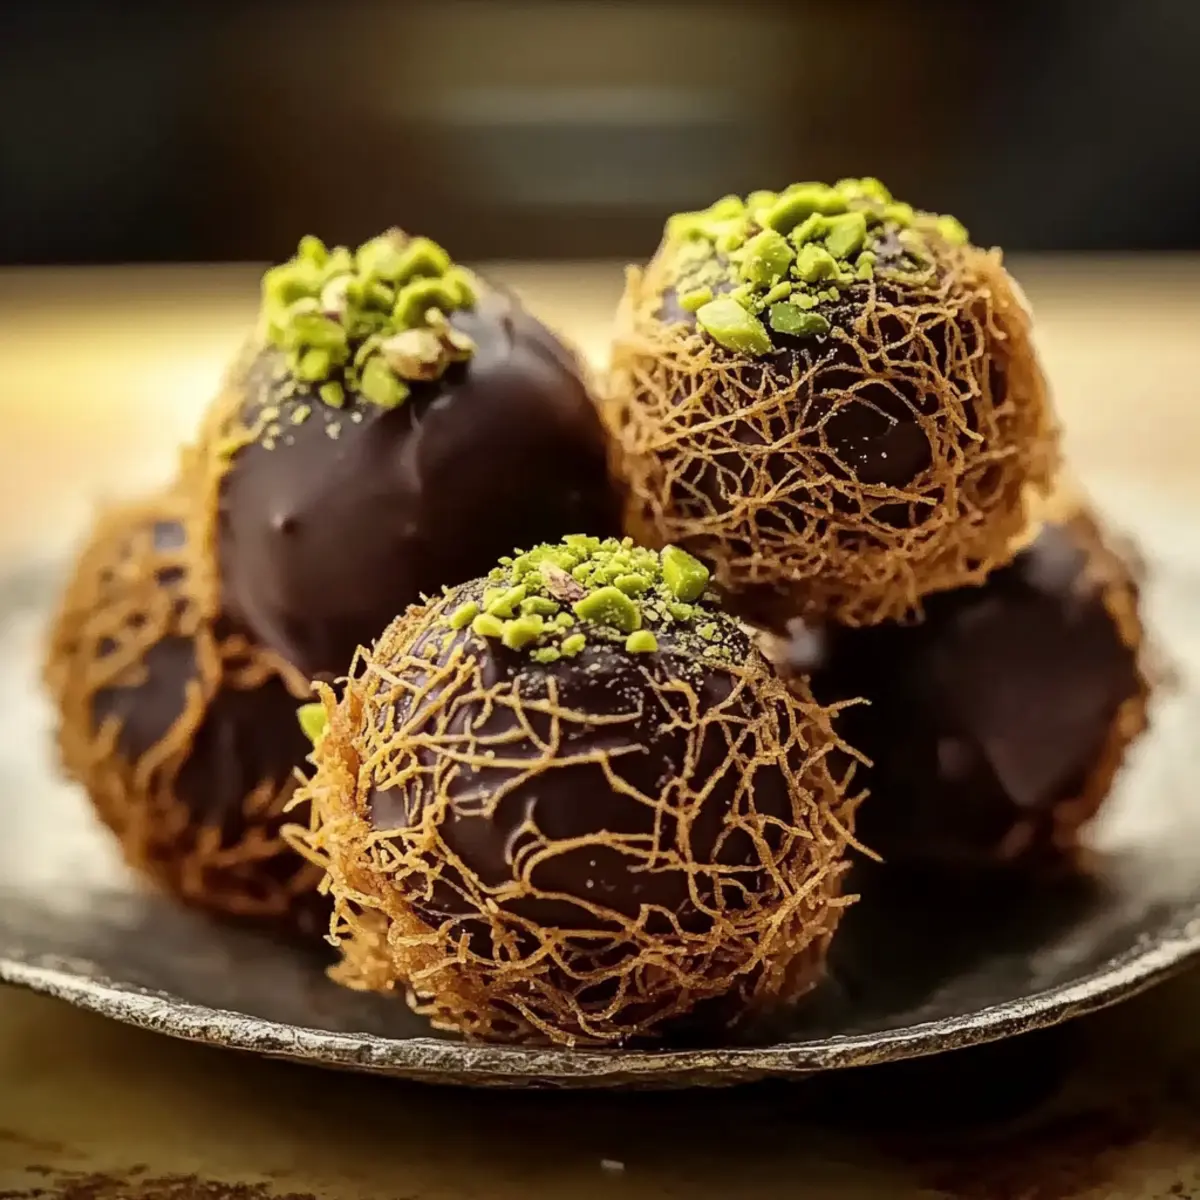
• Chopped Pistachios (3 tablespoons) – For decoration; toasted chopped pistachios not only enhance visual appeal but also add extra flavor.
Explore the scrumptious world of chocolate balls that will surely delight your taste buds!
Step‑by‑Step Instructions for Luxurious Dubai Chocolate Balls with Pistachio and Kataifi
Step 1: Prepare Kataifi Base
Preheat your oven to 350°F (175°C) and grab a baking sheet. Separate the kataifi strands, ensuring they’re fluffy and loose, then coat them with melted butter for a rich flavor. Spread the kataifi evenly on the prepared baking sheet and bake for 12–15 minutes, until golden brown and crispy. Once baked, remove from the oven and let it cool completely before proceeding to the next step.
Step 2: Create Pistachio Filling
While your kataifi cools, melt the white chocolate in a microwave-safe bowl, stirring every 20 seconds to ensure smoothness. Once melted, mix in the natural pistachio butter and a pinch of salt, adjusting consistency with vegetable oil if it feels too thick. The filling should be creamy and luscious, ready to complement the crunchy kataifi.
Step 3: Combine Ingredients
Finely chop the cooled kataifi into small pieces that will blend well with the pistachio filling. In a large mixing bowl, gently fold the chopped kataifi into the pistachio mixture, ensuring it is evenly distributed. This combination will form the base for your chocolate balls, balancing the crispy and creamy textures beautifully.
Step 4: Shape Balls
Using your hands, form walnut-sized balls from the mixture, ensuring they are compact and well-formed. Place each ball onto a parchment-lined tray while continuing to shape the remaining mixture. Once finished, chill the tray in the refrigerator for at least 30 minutes to firm up the chocolate balls, allowing the flavors to meld.
Step 5: Prepare Chocolate Coating
In a separate bowl, melt the dark chocolate carefully, stirring until it’s completely smooth. It’s best to do this in short intervals in the microwave or over a double boiler to avoid burning. Once melted, your rich chocolate coating will be ready, adding depth and richness to the luxurious chocolate balls.
Step 6: Coat Balls
Remove the chilled chocolate balls from the refrigerator; one by one, dip each ball into the melted dark chocolate, ensuring they are fully coated. Gently tap the balls on the side of the bowl to remove excess chocolate. Immediately sprinkle each one with chopped pistachios for a beautiful finish and added crunch before the chocolate sets.
Step 7: Set and Store
Allow the coated chocolate balls to sit at room temperature for about 15 minutes until the chocolate has completely set. For storage, keep your luxurious Dubai chocolate balls in an airtight container at room temperature or refrigerate them to maintain freshness. These delightful treats can be enjoyed for up to a week, so share them with friends and family!
What to Serve with Luxurious Dubai Chocolate Balls with Pistachio and Kataifi
Elevate your dessert experience by creating a well-rounded meal that tantalizes the senses and invites conversation around the table.
-
Turkish Coffee: The rich, bold flavors of Turkish coffee create a perfect pairing, cutting through the sweetness of the chocolate balls. A warm cup of coffee adds an aromatic touch to your dessert spread.
-
Fresh Fruit Platter: A colorful array of seasonal fruits adds a refreshing balance to the richness of the chocolate. Think juicy oranges, crunchy apples, and sweet pomegranates for a vibrant contrast.
-
Cardamom-Spiced Tea: The warm spices of cardamom-infused tea echo the flavors of the chocolate balls. This soothing beverage pairs beautifully, wrapping you in a cozy embrace with every sip.
-
Pistachio Ice Cream: Indulge in creamy pistachio ice cream to enhance the nutty elements of the chocolate balls. The smooth texture and subtle sweetness provide a deliciously cooling contrast.
-
Baklava Bites: For those who crave more Middle Eastern delights, pair your chocolate balls with crunchy, syrup-soaked baklava. Together, they create a dreamy dessert platter that celebrates traditional flavors.
-
Coconut Bliss Balls: These light and fluffy bliss balls made with coconut also add a delightful chewiness while offering a different flavor profile. They make for excellent finger food alongside your chocolate treat.
-
Mint Chocolate Chip Smoothie: Whip up a mint chocolate chip smoothie for a refreshing drink that complements the richness of the chocolate. The freshness of mint can brighten up the flavor profile while keeping the dessert vibe festive.
-
Orange Blossom Water Cake: This moist cake infused with floral orange blossom water will not only highlight the Middle Eastern theme but will provide a light, floral finish to your indulgent meal.
-
Rosewater Panna Cotta: A silky-smooth panna cotta infused with rosewater creates a sumptuous finish while beautifully tying in the flavors of your Dubai chocolate balls. It brings an enchanting element to your dessert table.
Immerse yourself in the luxurious flavors of these chocolate balls while enjoying the added delights of these tempting pairings!
Make Ahead Options
These Luxurious Dubai Chocolate Balls with Pistachio and Kataifi are excellent for busy home cooks looking to save time! You can prepare the kataifi base and pistachio filling up to 24 hours in advance, storing them separately in airtight containers in the refrigerator to maintain their ideal texture. When ready to serve, simply combine the cooled kataifi with the filling, shape into balls, and chill again for at least 30 minutes. Finish by dipping in dark chocolate and letting them set for 15 minutes before enjoying. This method not only saves valuable prep time but ensures each bite remains just as delicious and satisfying as if made fresh!
How to Store and Freeze Chocolate Balls
Room Temperature: Store chocolate balls in an airtight container at room temperature for up to 1 week. Keep them in a cool and dry place to maintain their texture.
Fridge: To extend freshness, refrigerate your chocolate balls. They can last in the fridge for up to 1 week; just make sure they’re sealed to prevent them from absorbing unwanted odors.
Freezer: Freeze your chocolate balls for up to 3 months. Place them in a single layer on a baking sheet until frozen solid, then transfer to an airtight container. Thaw overnight in the fridge before serving.
Reheating: No need to reheat; the chocolate balls are best enjoyed chilled or at room temperature, preserving their delightful flavors and textures.
Chocolate Balls: Delightful Variations
Feel free to personalize your chocolate balls with these creative twists that will tantalize your taste buds!
- Nut Butter Swap: Replace pistachio butter with almond butter or tahini for a unique flavor twist that’s equally delicious.
- Milk Chocolate Coating: Use milk chocolate instead of dark for a sweeter, creamier experience that will appeal to all ages.
- Spicy Kick: Add a pinch of cayenne pepper to the pistachio filling for a surprising heat that perfectly complements the sweetness.
- Citrus Infusion: Incorporate orange zest or vanilla extract into the filling to brighten the flavors and add a fragrant touch.
- Vegan Option: For a delicious vegan version, swap in coconut oil and dairy-free chocolate to keep everyone included in the fun!
- Gluten-Free Base: Use gluten-free kataifi or crumble gluten-free cake for a satisfying crunch without compromising the recipe.
- Fruity Surprise: Mix in mini dried fruits like cranberries or apricots for a sweet and tangy burst of flavor that refreshes each bite.
For more inspired treats, don’t miss out on crafting some rich Double Chocolate Peppermint cookies next or try the delightful White Chocolate Blueberry truffles!
Expert Tips for Chocolate Balls
-
Keep it Crisp: Cover kataifi while working to prevent it from becoming soggy. This ensures your chocolate balls maintain that delightful crunch.
-
Cool Completely: Make sure the baked kataifi is completely cool before mixing it into the filling; retaining the right texture in your chocolate balls is key.
-
Perfectly Temper Chocolate: For a glossy finish, properly temper your dark chocolate before coating the balls. This enhances both appearance and taste.
-
Adjust Consistency: If the pistachio filling is too thick, don’t hesitate to add a bit more neutral vegetable oil. This will help create a smooth filling for your chocolate balls.
-
Store Smartly: To keep your chocolate balls fresh and crunchy, store them in a cool, dry place. Avoid humidity for the best results.
Luxurious Dubai Chocolate Balls with Pistachio and Kataifi Recipe FAQs
How do I select the right kataifi pastry?
Absolutely! When choosing kataifi pastry, look for strands that appear fluffy and moist, avoiding any packages with dark spots or visible breaks. Fresh kataifi will yield the best crunch when baked. If fresh isn’t available, you can also use frozen, but make sure to thaw it in the fridge before working with it.
How should I store leftover chocolate balls?
Very! Keep your chocolate balls in an airtight container at room temperature for up to 1 week. To maintain their freshness longer, refrigerate them for 7 days. Just ensure they’re sealed well to prevent them from absorbing any unwanted odors.
Can I freeze chocolate balls, and if so, how?
Absolutely! To freeze your chocolate balls, place them in a single layer on a baking sheet and freeze until solid, about 1-2 hours. Once frozen, transfer them to an airtight container or freezer bag and store for up to 3 months. Thaw them overnight in the fridge before serving to preserve their delightful flavors and textures.
I’m having trouble melting the dark chocolate. What should I do?
Don’t worry, it happens to the best of us! If your chocolate isn’t melting smoothly, try using a double boiler instead of the microwave. Place a heatproof bowl over a pot of simmering water, gently stirring until it melts. Remember to avoid getting any water into the chocolate, as even a drop can cause it to seize.
Can I make these chocolate balls vegan or gluten-free?
Absolutely! For a vegan version, substitute the butter with coconut oil and use dairy-free chocolate for the coating. To make them gluten-free, you can swap regular kataifi with a gluten-free option or use crushed gluten-free cake crumbs. The beauty of this recipe is its versatility, allowing you to cater to various dietary preferences while still enjoying delicious chocolate balls.
What’s the best way to ensure my chocolate balls have a glossy finish?
Ah, the secret to that shiny finish! To get a glossy coating, be sure to temper your dark chocolate before using it to coat the balls. This involves melting it to a certain temperature, letting it cool slightly, and then reheating it. Following this method helps stabilize the cocoa butter to achieve that coveted sheen on your chocolate balls.
Mouthwatering Chocolate Balls: Easy Recipe with a Twist
Ingredients
Equipment
Method
- Preheat your oven to 350°F (175°C) and prepare a baking sheet.
- Separate kataifi strands and coat with melted butter. Spread on the baking sheet and bake for 12-15 minutes until golden.
- Melt white chocolate in a microwave-safe bowl, then mix in pistachio butter and salt.
- Chop the cooled kataifi into small pieces and fold into pistachio mixture.
- Form walnut-sized balls from the mixture and chill for 30 minutes.
- Melt dark chocolate and coat each chilled ball, sprinkling with chopped pistachios.
- Let the coated balls set at room temperature for 15 minutes before storing.
Leave a Reply