
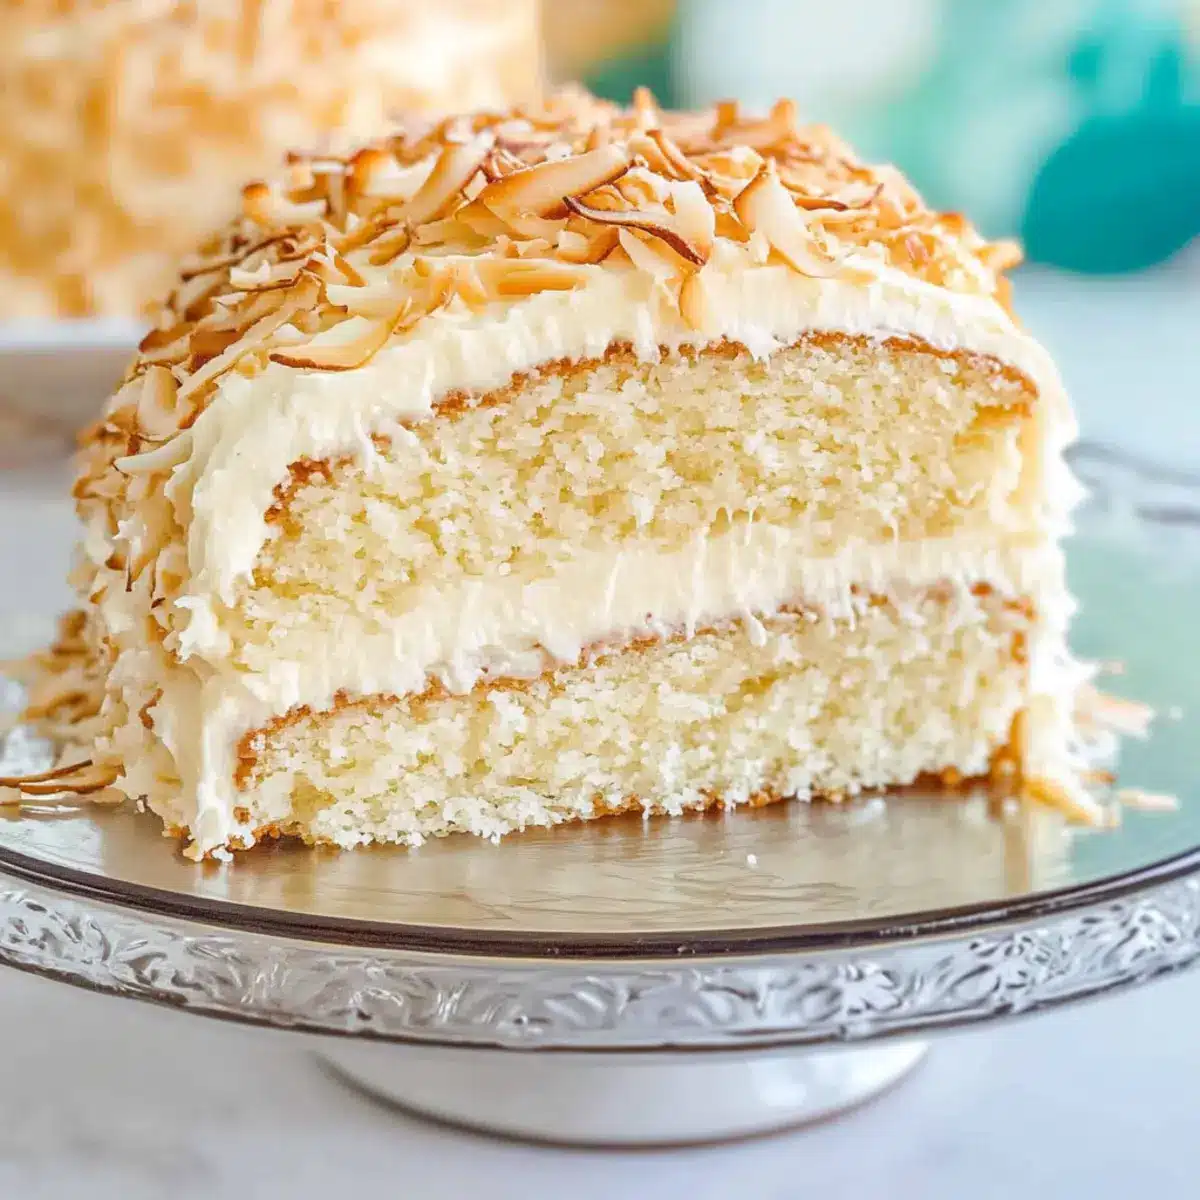
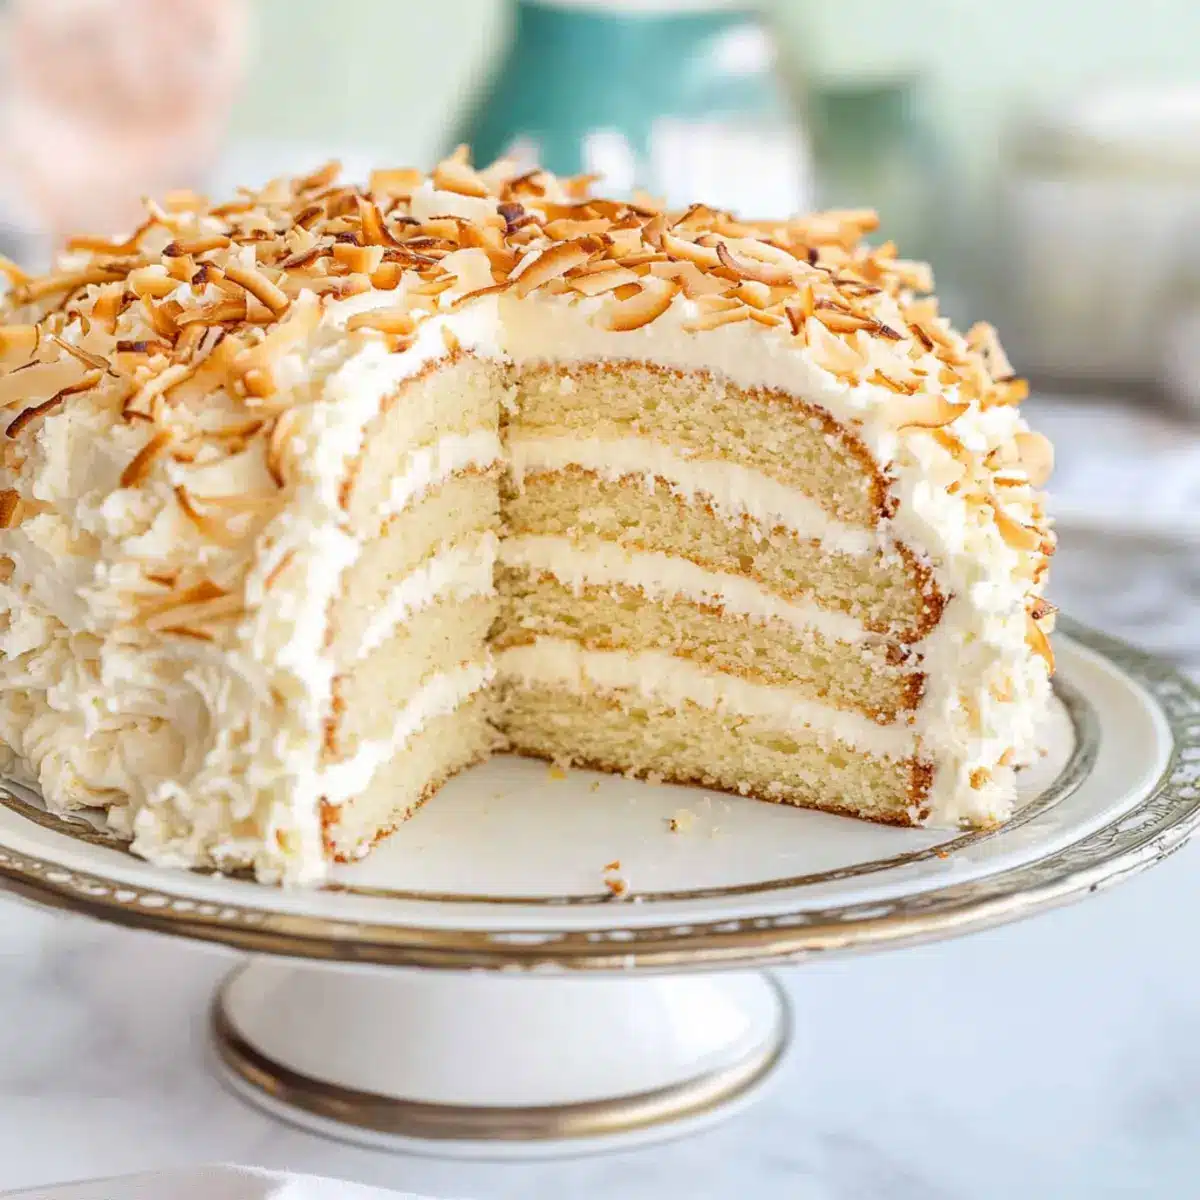
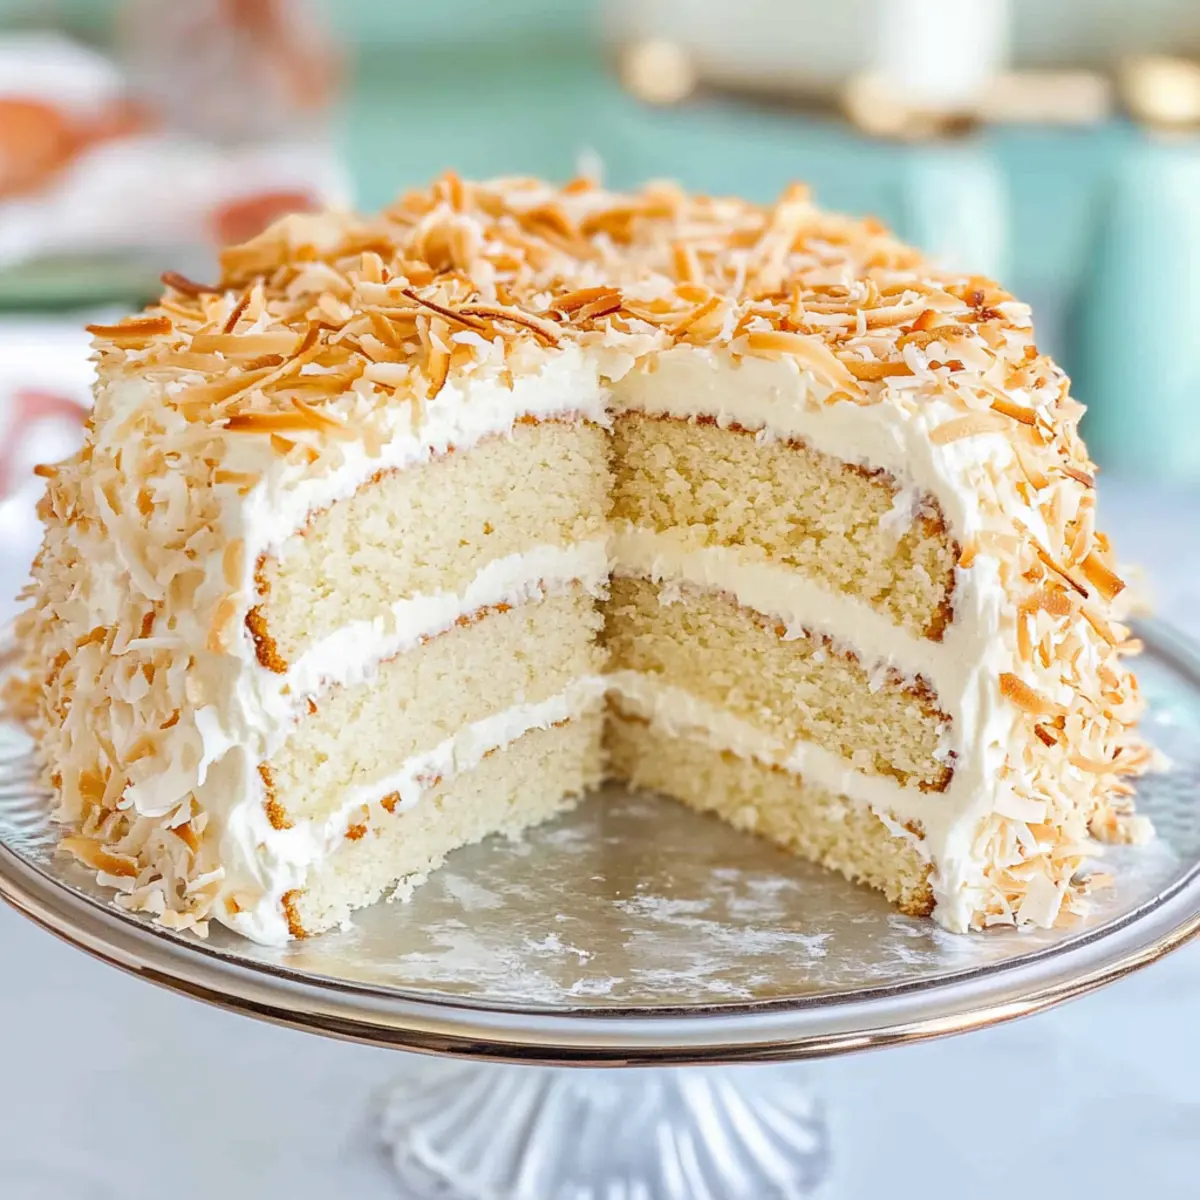
There’s something magical about celebrating special occasions with a stunning cake that looks as good as it tastes. This Gluten-Free Toasted Coconut Layer Cake transforms any gathering into an unforgettable feast, featuring four moist layers soaked in coconut simple syrup that are beautifully balanced with creamy coconut filling. One of the best parts? This cake is not just a crowd-pleaser; it’s also gluten-free, making it a delightful option for everyone at your table. Plus, it’s a fun baking project that fills your kitchen with the irresistible aroma of toasting coconut, creating memories with each slice. Are you ready to dive in and impress your family and friends? Let’s get baking!
Why Is This Cake So Irresistible?
Layers of Flavor: Each layer of this Gluten-Free Toasted Coconut Layer Cake is an explosion of coconut goodness, soaked in simple syrup for the ultimate moistness.
Simple to Make: With straightforward steps, even novice bakers can create this stunning dessert. If you’re feeling adventurous, try pairing it with a scoop of fresh coconut sorbet for a delightful treat.
Visual Appeal: Its gorgeous layers and toasted coconut topping make it not only delicious but also a showstopper at any gathering.
Diet-Friendly: Perfect for those avoiding gluten but craving something sweet, this cake is a fantastic addition to your baking repertoire.
Celebratory Delight: Whether it’s a birthday or holiday, this cake elevates any occasion into a festive gathering. Plus, you might enjoy making other treats like Baked Cod in Coconut Lemon Cream to accompany the celebrations!
Gluten Free Toasted Coconut Layer Cake Ingredients
• These ingredients will help you create a delightful masterpiece!
For the Coconut Custard
- Whole Milk – Provides moisture and richness; substitute with almond milk for a dairy-free option.
- Canned Unsweetened Coconut Milk – Adds a strong coconut flavor; be sure it’s unsweetened to control sweetness.
- Egg Yolks – Essential for custard texture; can use flaxseed meal mixed with water as an egg replacer.
- Granulated Sugar – Sweetens the cake and custard; coconut sugar can be a less processed substitute.
- Cornstarch – Thickens the custard; arrowroot powder is a good alternative.
- Coconut Rum – Enriches the flavor; use coconut extract as a non-alcoholic substitute.
For the Cake
- Gluten Free All-Purpose Flour Blend – Provides structure; ensure it contains xanthan gum for proper texture.
- Baking Powder – Adds leavening; confirm it’s gluten-free certified.
- Baking Soda – Helps the cake rise; no substitutes are necessary.
- Salt – Balances sweetness and enhances flavor; essential for the best taste.
For the Buttercream
- Unsalted Butter – Adds flavor and moisture; dairy-free margarine can be an alternative.
- Powdered Sugar – Sweetens the buttercream; erythritol can be used for a low-sugar option.
- Sweetened Flaked Coconut – Introduces coconut texture and flavor; opt for unsweetened for lower sugar content.
For Assembly & Moisture
- Water and Extra Sugar – Used to create the coconut simple syrup, essential for cake moisture.
These carefully selected ingredients are the key to creating the perfect Gluten Free Toasted Coconut Layer Cake that’s sure to impress!
Step‑by‑Step Instructions for Gluten-Free Toasted Coconut Layer Cake
Step 1: Make Coconut Custard
In a medium saucepan over medium heat, combine whole milk and canned unsweetened coconut milk and gently simmer. Whisk together the egg yolks, granulated sugar, and cornstarch in a bowl. Slowly add the hot milk mixture, stirring continuously until thickened, about 5-7 minutes. Remove from heat, pour into a bowl, cover with plastic wrap, and cool completely in the refrigerator.
Step 2: Prepare the Cake Batter
Preheat your oven to 350°F (175°C) and grease two 9-inch round cake pans. In a separate bowl, mix together the gluten-free all-purpose flour blend, baking powder, baking soda, and salt. In a stand mixer, cream unsalted butter and sugar until light and fluffy. Incorporate the egg whites and vanilla extract and mix well. Gradually alternate adding the dry ingredients and milk mixture, mixing until combined.
Step 3: Bake the Cake
Divide the batter evenly between the prepared cake pans and smooth the tops. Bake in the preheated oven for 25-30 minutes, or until a toothpick inserted into the centers comes out clean and the tops are golden brown. Once baked, let the cakes cool in the pans for about 10 minutes before carefully inverting them onto wire racks to cool completely.
Step 4: Toast Coconut
Spread sweetened flaked coconut on a baking sheet in a single layer. Place in the oven at 350°F (175°C) for about 5-7 minutes, stirring halfway through, until golden brown and fragrant. Keep an eye on it to prevent burning, as it can toast quickly. Set aside to cool, and savor the delightful aroma of toasted coconut.
Step 5: Make Simple Syrup
In a small saucepan, combine equal parts water and granulated sugar (about 1 cup each) and bring to a boil over medium heat. Stir until the sugar has dissolved, then remove from heat and let it cool. Soak shredded unsweetened coconut in the syrup for about 10 minutes, then strain the coconut, reserving the syrup for moistening the cake layers.
Step 6: Prepare Buttercream
In a mixing bowl, beat softened unsalted butter until creamy. Gradually add powdered sugar while mixing on low speed, then increase to medium until light and fluffy. Incorporate the chilled coconut custard and a pinch of salt, mixing until fully combined and smooth. This luscious buttercream will perfectly complement your Gluten-Free Toasted Coconut Layer Cake.
Step 7: Assemble Cake
Once the cake layers are cool, carefully slice each layer in half horizontally to create a total of four layers. Place one layer on a serving platter, soak it with the prepared coconut simple syrup, then add a layer of coconut custard filling. Repeat with the remaining layers, soaking and layering the custard between them. Finally, frost the top and sides with the buttercream and generously coat with the toasted coconut flakes for an irresistible finish.

Gluten Free Toasted Coconut Layer Cake Variations
Feel free to get creative and make this delightful cake your own with these simple substitutions and additions!
-
Dairy-Free: Use almond or oat milk instead of whole milk for a delicious dairy-free twist.
Almond milk adds a subtle nutty flavor that complements the coconut beautifully. -
Nutty Crunch: Replace toasted coconut with crushed pecans or walnuts for a textured layer of flavor.
This swap adds a delightful crunch that pairs perfectly with the cake’s soft layers. -
Tropical Adventure: Swirl in passion fruit puree into the coconut custard for a tropical burst of flavor.
Expect a tangy-sweet surprise that elevates your cake to a whole new level! -
Low-Sugar Option: Substitute granulated sugar with erythritol to create a low-sugar version of the cake.
This simple swap gives you sweetness without the extra calories, letting you indulge guilt-free. -
Citrus Zing: Add a tablespoon of fresh lime or lemon juice to the buttercream for tangy brightness.
This hint of citrus will cut through the richness and make each bite even more refreshing. -
Fruity Filling: Layer the cake with fresh mango or pineapple slices for a fruity dimension.
Not only will this add a burst of flavor, but it also enhances the visual appeal of your cake. -
Flavored Simple Syrup: Infuse your coconut simple syrup with vanilla or almond extract for extra depth.
This little enhancement can transform your cake into a true showstopper. -
Chocolate Twist: Drizzle melted chocolate over the top for an indulgent, rich finish.
Chocolate and coconut are a winning combination that will impress even the most discerning sweet tooth.
Creating your unique version of this cake not only showcases your personality but also ensures that everyone can enjoy a treat tailored to their tastes. If you’re inspired to try other flavors and treats, consider pairing this with a side of Wild Blueberry Coffee Cake at brunch!
What to Serve with Gluten-Free Toasted Coconut Layer Cake
Indulging in a slice of this stunning dessert deserves to be paired with delightful accompaniments that enhance its rich coconut flavor.
- Fresh Coconut Sorbet: A refreshing side that adds a cooling effect, complementing the layers of sweetness in the cake.
- Tropical Fruit Salad: A vibrant mix of mango, pineapple, and kiwi offers a burst of freshness that balances the cake’s richness.
- Chocolate Drizzle: Pour a warm chocolate ganache over each slice for a touch of decadence that contrasts beautifully with the coconut.
- Light Whipped Cream: A dollop of lightly sweetened whipped cream adds an airy touch, enhancing the overall texture of each bite.
- Coconut Milkshake: A creamy beverage made with coconut milk and ice cream supplies a delicious coconut experience, perfect for dessert lovers.
- Cashew Cookies: These nutty cookies provide a crunchy texture, beautifully contrasting with the soft layers of the cake while keeping the coconut theme.
- Spiced Tea: A warm cup of chai or spiced tea brings a cozy warmth, amplifying the flavors of coconut and sweetness found in the cake.
- Pineapple Upside-Down Cake: Consider serving a slice of this retro dessert alongside, creating a wonderful flavor pairing that both kids and adults will enjoy.
- Vanilla Ice Cream: Serve with a scoop of classic vanilla ice cream for a simple yet satisfying way to finish off the meal.
Storage Tips for Gluten-Free Toasted Coconut Layer Cake
Fridge: Store leftover cake in an airtight container for up to 3 days to maintain its freshness and flavor.
Freezer: Wrap individual slices tightly in plastic wrap, then place in a freezer-safe container. Enjoy them for up to 2 months without losing moisture and taste.
Reheating: Thaw frozen slices in the fridge overnight, or warm them gently in the microwave for 10-15 seconds to bring back their delightful softness before serving.
To prevent dryness: Always ensure the cake is wrapped well to keep it from absorbing any odors or losing moisture while stored.
Make Ahead Options
These tips for preparing your Gluten-Free Toasted Coconut Layer Cake ahead of time are perfect for busy home cooks! You can make the coconut custard and the buttercream up to 3 days in advance; simply store them in airtight containers in the refrigerator to maintain their creamy texture. The cake layers can be baked a day ahead and kept wrapped in plastic wrap to prevent them from drying out. When you’re ready to assemble, soak the layers in coconut simple syrup (made fresh) and layer with the custard, then frost with the buttercream. This method allows you to lessen your stress on the big day while still delivering a delicious, homemade cake that tastes just as delightful!
Expert Tips for Baking the Perfect Cake
-
Beat Egg Whites Properly: Ensure your egg whites are beaten to stiff peaks; this crucial step provides the fluffy texture in your Gluten-Free Toasted Coconut Layer Cake.
-
Leveling Layers: Use a serrated knife to even out the tops of your cake layers before frosting; this stabilizes the cake and creates a professional appearance.
-
Moisture is Key: Don’t skip the coconut simple syrup—it keeps each layer moist and adds an extra coconut flavor to your cake.
-
Cool Completely: Let the layers cool completely before assembling the cake; this prevents the buttercream from melting and sliding off.
-
Toast with Care: Monitor the coconut while toasting it in the oven, stirring occasionally to avoid burning; perfectly toasted coconut enhances the overall flavor and texture of your cake.
Gluten-Free Toasted Coconut Layer Cake Recipe FAQs
What type of coconut should I use for the best flavor?
For a rich coconut flavor, I recommend using canned unsweetened coconut milk as well as sweetened flaked coconut in the recipe. Be sure the flaked coconut you select is ideally fresh, as older coconut may develop off flavors or undesirable textures.
How should I store the Gluten-Free Toasted Coconut Layer Cake?
Store leftover cake in an airtight container in the refrigerator for up to 3 days. To keep it fresh, make sure it’s tightly sealed to prevent it from drying out or absorbing other odors from the fridge.
Can I freeze the cake, and how do I do that?
Absolutely! To freeze the Gluten-Free Toasted Coconut Layer Cake, wrap individual slices tightly in plastic wrap and then place them into a freezer-safe container or bag. It can be kept in the freezer for up to 2 months. When you’re ready to enjoy, simply thaw the slices in the refrigerator overnight, or warm them gently in the microwave for a refreshing treat.
Why did my cake not rise properly?
If your cake didn’t rise as expected, check if your baking powder and baking soda are fresh, as old leavening agents may lose their effectiveness. Also, make sure to beat the egg whites until stiff peaks form; this crucial step introduces air into the batter for a fluffy texture. Lastly, remember not to overmix the batter after adding the dry ingredients, as this can deflate the beaten egg whites.
Is this cake safe for those with allergies?
While this Gluten-Free Toasted Coconut Layer Cake is gluten-free, it contains dairy and eggs. For dairy-free options, you can substitute whole milk with almond milk and butter with dairy-free margarine. Additionally, flaxseed meal mixed with water can replace egg yolks, making this recipe suitable for vegans as well. Always check for allergens in packaged ingredients, such as your flour blend.
What is the ideal way to check if the cake is done?
To check if your cake is done baking, insert a toothpick into the center of the cake layers. The toothpick should come out clean or with just a few moist crumbs, indicating that the cake is fully baked. If it has wet batter sticking to it, give it a few more minutes in the oven and check again.
Irresistible Gluten Free Toasted Coconut Layer Cake Bliss
Ingredients
Equipment
Method
- Make Coconut Custard: In a medium saucepan over medium heat, combine whole milk and canned unsweetened coconut milk and gently simmer. Whisk together the egg yolks, granulated sugar, and cornstarch in a bowl. Slowly add the hot milk mixture, stirring continuously until thickened, about 5-7 minutes. Remove from heat, pour into a bowl, cover with plastic wrap, and cool completely in the refrigerator.
- Prepare the Cake Batter: Preheat your oven to 350°F (175°C) and grease two 9-inch round cake pans. In a separate bowl, mix together the gluten-free all-purpose flour blend, baking powder, baking soda, and salt. In a stand mixer, cream unsalted butter and sugar until light and fluffy. Incorporate the egg whites and vanilla extract and mix well. Gradually alternate adding the dry ingredients and milk mixture, mixing until combined.
- Bake the Cake: Divide the batter evenly between the prepared cake pans and smooth the tops. Bake in the preheated oven for 25-30 minutes, or until a toothpick inserted into the centers comes out clean and the tops are golden brown. Once baked, let the cakes cool in the pans for about 10 minutes before carefully inverting them onto wire racks to cool completely.
- Toast Coconut: Spread sweetened flaked coconut on a baking sheet in a single layer. Place in the oven at 350°F (175°C) for about 5-7 minutes, stirring halfway through, until golden brown and fragrant. Set aside to cool.
- Make Simple Syrup: In a small saucepan, combine equal parts water and granulated sugar (about 1 cup each) and bring to a boil over medium heat. Stir until the sugar has dissolved, then remove from heat and let it cool.
- Prepare Buttercream: In a mixing bowl, beat softened unsalted butter until creamy. Gradually add powdered sugar while mixing on low speed, then increase to medium until light and fluffy. Incorporate the chilled coconut custard and a pinch of salt, mixing until fully combined and smooth.
- Assemble Cake: Once the cake layers are cool, carefully slice each layer in half horizontally to create a total of four layers. Soak each layer with the prepared coconut simple syrup, then add a layer of coconut custard filling. Repeat with the remaining layers, then frost the top and sides with the buttercream and generously coat with the toasted coconut flakes.
Leave a Reply