
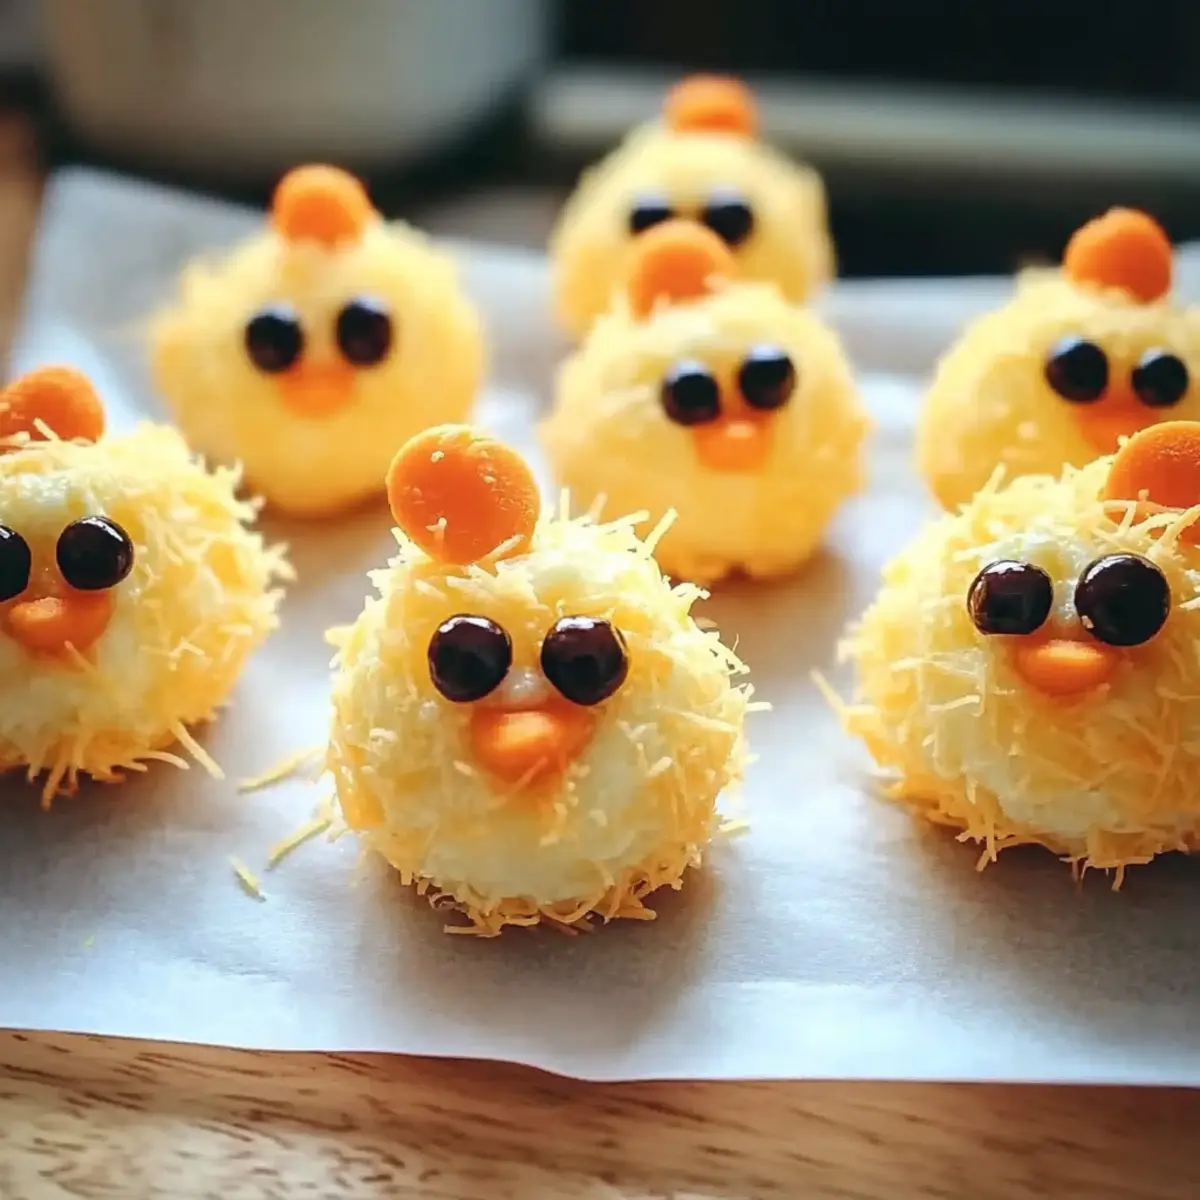
As I scrolled through social media, I stumbled upon an adorable image of tiny cheese balls shaped like little chicks, and my heart was instantly captured. These Mini Chicks Cheese Balls are more than just a festive appetizer; they’re the perfect way to add a sprinkle of joy to your Easter gathering. Packed with creamy goodness and a delightful mix of crunchy garnishes, this recipe is not only quick to assemble, but it’s also a sure crowd-pleaser for both kids and adults alike. Imagine the smiles as your loved ones reach for these bite-sized treasures, making every gathering a bit more special. Ready to impress with a fun and flavorful addition to your holiday table? Let me show you how to create these charming cheese balls that are sure to be the talk of the party!
Why Are These Cheese Balls a Must-Try?
Festive Appeal: These Mini Chicks Cheese Balls will instantly brighten up your holiday table with their adorable appearance.
Kid-Friendly Fun: Perfect for kids and adults, these treats will bring smiles all around and make snack time a blast.
Quick Assembly: With easy preparation and minimal cooking involved, you’ll have more time to enjoy your gathering.
Versatile Variations: Want to customize? Simply swap out bacon for sun-dried tomatoes or experiment with various cheeses to suit your taste! Check out my Mini Lemon Cheesecakes for another delightful bite-sized treat.
Crowd-Pleasing: Serve alongside your favorite crackers or veggies, and watch them disappear in an instant! These bites are not just food; they’re a conversation starter for any gathering.
Mini Chicks Cheese Balls Ingredients
Get ready to make your festive gathering even more delightful with these whimsical Mini Chicks Cheese Balls!
For the Cheese Mixture
- Cream Cheese – the base for rich creaminess; Greek yogurt makes a lighter substitute.
- Cheddar Cheese – gives sharp flavor and firmness; for a milder taste, swap with Monterey Jack.
- Bacon – adds savory, smoky goodness; omit for a vegetarian option and replace with smoked paprika.
- Ranch Seasoning Mix – provides tangy and herbaceous flavor; use a homemade blend or Italian seasoning for a twist.
For the Decoration
- Olives – perfect for eyes, adding salty contrast; capers can stand in for a similar effect.
- Carrots – cut into small pieces for beaks, adding color and crunch; sliced radishes can be used for a different look.
These Mini Chicks Cheese Balls are not just a treat but an adorable centerpiece, capturing attention as much as taste!
Step‑by‑Step Instructions for Mini Chicks Cheese Balls
Step 1: Mix Cream Cheese Mixture
In a large mixing bowl, combine 8 ounces of softened cream cheese, 1 cup of shredded cheddar cheese, ½ cup of crumbled bacon (or smoked paprika for a vegetarian option), and 1 tablespoon of ranch seasoning mix. Use a spatula or electric mixer to blend until the mixture is smooth and creamy—about 2-3 minutes. This creamy base will be the heart of your Mini Chicks Cheese Balls.
Step 2: Form Balls
Once the cheese mixture is well blended, use your hands to scoop out about 1-inch portions of the mixture. Roll each portion into a ball between your palms, ensuring they are nicely round and compact. Set the cheese balls aside on a parchment-lined tray as you complete this step. This playful shaping adds to the charm of your Mini Chicks Cheese Balls.
Step 3: Coat Balls
After forming the balls, prepare a shallow dish with additional shredded cheddar cheese for coating. Roll each cheese ball gently in the cheddar until fully covered, pressing lightly to adhere. This outer layer adds flavor and an appealing crunch to your Mini Chicks Cheese Balls. Place the coated balls back on the parchment-lined tray.
Step 4: Decorate
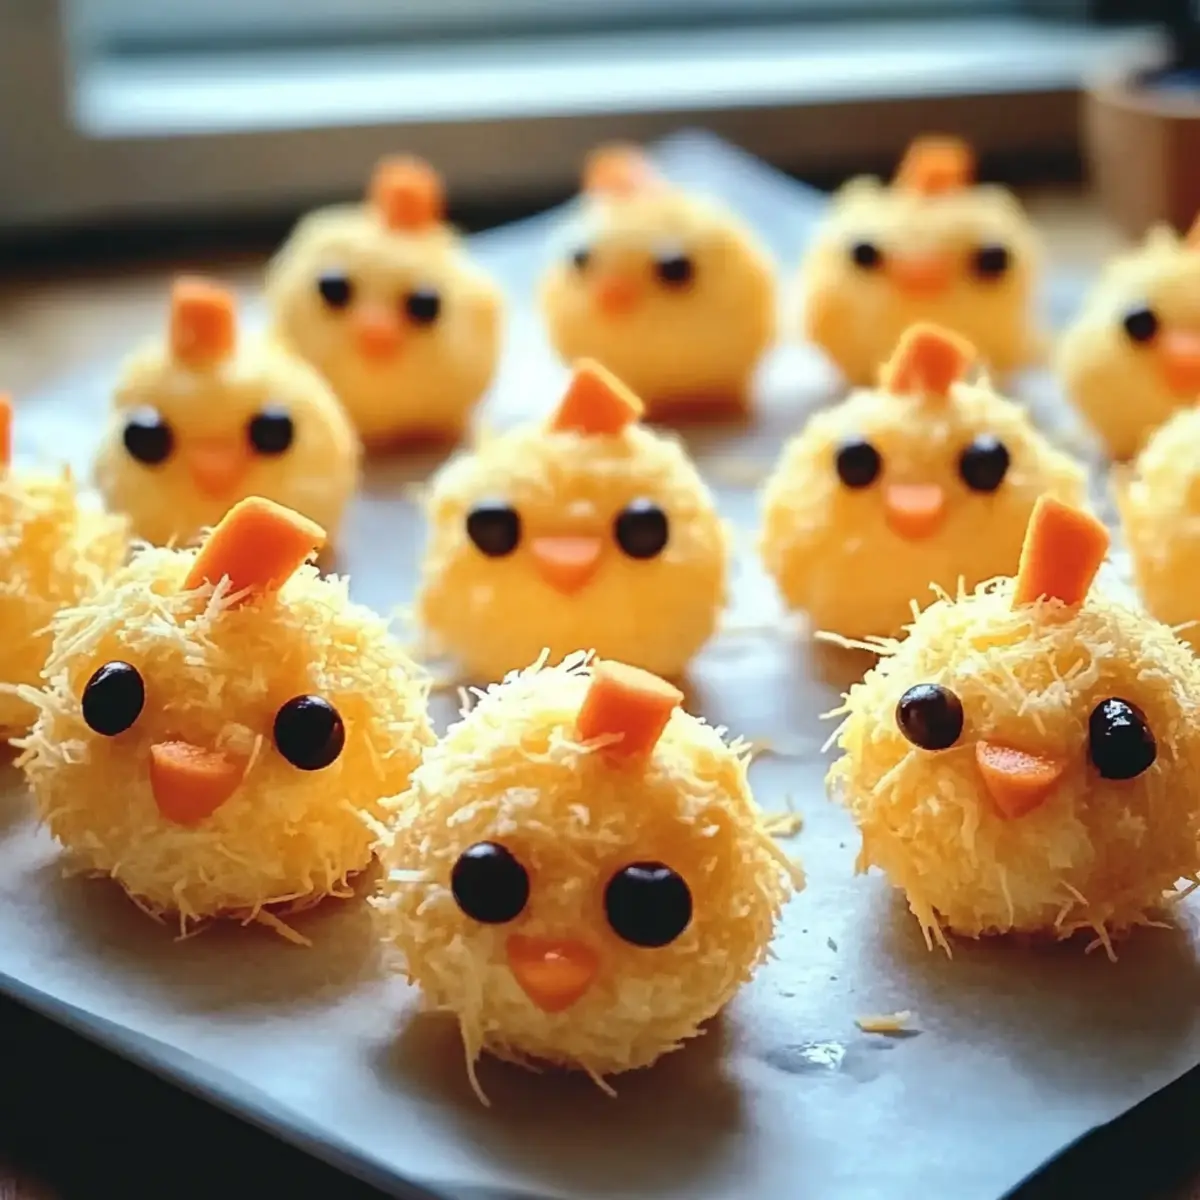
Now comes the fun part! Take 12-24 slices of pitted olives and press two slices onto each cheese ball as eyes. For the beaks, cut small triangles from fresh carrots and gently insert them into the cheese balls. This creative decoration will make your Mini Chicks Cheese Balls look adorable and festive, perfect for your Easter gathering.
Step 5: Serve
To serve your delightful Mini Chicks Cheese Balls, arrange them beautifully on a serving platter. Consider adding some crackers or fresh vegetables around them for a colorful presentation. These charming little bites are ready to impress your guests, combining delightful flavor and festive fun in every bite. Enjoy the smiles they bring!
Mini Chicks Cheese Balls Variations
Feel free to get creative with these whimsical Mini Chicks Cheese Balls, making them your own with delicious twists!
-
Vegetarian Delight: Omit the bacon and replace it with finely chopped sun-dried tomatoes for an umami punch. They’ll still be packed with flavor!
-
Cheesy Heat: Substitute cheddar with pepper jack cheese for an added kick. The creamy texture pairs beautifully with a hint of spiciness.
-
Smoky Flavor: Swap bacon for smoked paprika, creating that savory, smoky essence without any meat. It’s a delightful surprise for the taste buds!
-
Herb Garden: Use a combination of dill and chives in place of ranch seasoning for a fresh and herby flavor profile. This twist brings a garden-fresh vibe to the appetizer!
-
Animal Fun: Shape the cheese balls into other playful animals or festive shapes. Each creation can become a delightful conversation starter at your gathering.
-
Crunchy Coating: Roll the cheese balls in crushed nuts, such as almonds or pistachios, for an exciting texture contrast and nutty flavor.
-
Tangy Twist: Experiment with goat cheese in the mixture, adding a creamy yet tangy flavor. It’s a fabulous alternative for cheese lovers!
-
Dipper Option: Serve with vibrant, homemade dips like spinach artichoke for a rich taste experience. Check out my Blueberry Cream Cheese recipe for a sweet sideline option, balancing out those savory bites perfectly!
Expert Tips for Mini Chicks Cheese Balls
- Prep Ahead: Make the cheese ball mixture a day or two in advance and store it in the fridge for easier assembly before your gathering.
- Texture Matters: Avoid over-mixing the cheese mixture; this maintains its creamy texture and prevents it from becoming too dense.
- Cheese Choice: Use finely shredded cheddar for better adherence during the coating process, ensuring your Mini Chicks Cheese Balls hold their shape.
- Garnish Ideas: Get creative with decorations—try using different veggies for unique features or use herbs for a fresh touch!
- Serving Suggestions: Pair with an array of colorful vegetables or a variety of crackers to create a beautiful and inviting platter.
How to Store and Freeze Mini Chicks Cheese Balls
Fridge: Store leftover Mini Chicks Cheese Balls in an airtight container in the refrigerator for up to 3 days. For the best flavor and freshness, consume them as soon as possible.
Freezer: If you want to make them ahead of time, freeze the formed cheese balls without decoration for up to 2 months. Thaw in the fridge overnight before decorating and serving.
Reheating: These cheese balls are best enjoyed cold or at room temperature. If you prefer them warm, gently heat them in the oven at 350°F (175°C) for about 5-10 minutes until warm.
Wrapping: If freezing, wrap each cheese ball individually in plastic wrap and then place them in a freezer-safe bag to prevent freezer burn.
What to Serve with Adorable Mini Chicks Cheese Balls?
These festive bites are not only delightful treats but also stunning additions to an inviting spread that will elevate your entire gathering.
-
Crunchy Veggie Platter: A colorful assortment of carrots, bell peppers, and cucumbers adds fresh crunch and pairs perfectly with the cheesy goodness.
-
Savory Crackers: Opt for a variety of crackers—like rosemary or whole grain—that provide texture contrast and enhance the flavors of the cheese balls.
-
Zesty Dipping Sauce: A creamy ranch or tangy hot sauce dip brings an exciting flavor punch that complements the smokiness of the Mini Chicks Cheese Balls.
Imagine your friends and family eagerly reaching for the vibrant veggies and crackers, creating an inviting atmosphere that encourages mingling and conversation.
-
Refreshing Fruit Salad: Sweet and juicy fruits like strawberries and grapes cut through the richness, balancing the flavors beautifully.
-
Light White Wine: A chilled Sauvignon Blanc or Pinot Grigio is a refreshing choice that pairs nicely, enhancing the savory notes of the cheese.
-
Mini Chocolate Desserts: End the meal on a sweet note with mini chocolate mousse or cheesecake bites for a delightful contrast.
With these pairings, your Easter gathering will not only be festive but also a wonderland of tastes and textures that everyone will remember fondly!
Make Ahead Options
These Mini Chicks Cheese Balls are ideal for meal prep enthusiasts looking to save time on busy holidays! You can prepare the cheese ball mixture up to 24 hours in advance by mixing the cream cheese, cheddar, bacon (or smoked paprika), and ranch seasoning, then refrigerating it in an airtight container. To keep the flavors fresh and the texture creamy, avoid rolling the balls until just before serving. When ready to impress your guests, simply form the mixture into balls, coat them in shredded cheddar, and add the olive eyes and carrot beaks. With this make-ahead strategy, you’ll guarantee delightful, ready-to-serve appetizers that taste just as delicious as if you’d made them on the spot!
Mini Chicks Cheese Balls Recipe FAQs
What type of cream cheese should I use?
Absolutely! For the best texture, I recommend using full-fat cream cheese since it provides a rich, creamy base. If you prefer a lighter option, you can substitute it with Greek yogurt, but keep in mind that this may make the mixture slightly tangier.
How long do Mini Chicks Cheese Balls last in the fridge?
These delightful cheese balls can be stored in an airtight container in the refrigerator for up to 3 days. For the freshest taste and ideal texture, enjoy them within that timeframe, and make sure to store them as soon as possible after your gathering.
Can I freeze Mini Chicks Cheese Balls?
Yes! You can freeze the formed cheese balls without any decoration for up to 2 months. Here’s how to do it step-by-step: 1) Prepare the cheese balls as instructed but skip the decoration. 2) Wrap each cheese ball individually in plastic wrap. 3) Place all the wrapped balls in a freezer-safe bag to prevent freezer burn. When you’re ready to serve, thaw them in the fridge overnight, decorate, and they’ll be ready to impress your guests!
What if my cheese mixture is too sticky to roll into balls?
Don’t worry! If your mixture is too sticky, it might be due to over-mixing or using too warm cream cheese. Simply chill the mixture in the refrigerator for 30 minutes. This will help firm it up, making it easier to roll into those adorable little chick shapes without making a mess.
Are Mini Chicks Cheese Balls suitable for vegetarian diets?
Very! You can easily make these Mini Chicks Cheese Balls vegetarian-friendly by omitting the bacon and substituting smoked paprika for an added touch of flavor. This way, everyone can enjoy these charming bites, making them a perfect addition to any gathering!
Can pets eat Mini Chicks Cheese Balls?
It’s best to keep these cheese balls away from pets. Ingredients like cream cheese and bacon are not ideal for animals, and olives can be risky for dogs. If you want to share some joy with your furry friends, consider making a pet-safe treat instead!
Mini Chicks Cheese Balls: Delightful Bites for Your Easter Feast
Ingredients
Equipment
Method
- In a large mixing bowl, combine cream cheese, shredded cheddar cheese, crumbled bacon, and ranch seasoning mix. Blend until smooth and creamy—about 2-3 minutes.
- Scoop out about 1-inch portions of the mixture and roll into balls. Set aside on a parchment-lined tray.
- Prepare a shallow dish with additional shredded cheddar cheese for coating. Roll each cheese ball in the cheddar until fully covered.
- Press two slices of pitted olives onto each cheese ball as eyes and insert small triangles from carrots as beaks.
- Arrange the Mini Chicks Cheese Balls on a serving platter and add crackers or fresh vegetables around.
Leave a Reply