
As the aroma of garlic-shimmering butter fills your kitchen, the anticipation of a satisfying meal begins to stir. Baked Italian Sub Sandwiches are my go-to dish when I want something that wraps comfort in a crunchy exterior while still being quick to prepare. In just 35 minutes, you’ll have a spectacular sub that melds the gooey goodness of provolone and mozzarella with layers of savory deli meats, all nestled inside warm, toasted rolls. These crowd-pleasers are perfect for busy weeknights or lively gatherings, effortlessly transforming any ordinary dinner into a delightful feast. Ready to indulge your senses and impress your loved ones? Let’s dive into this mouthwatering recipe!

Why are Baked Italian Subs a Must-Try?
Simplicity at its finest: These Baked Italian Sub Sandwiches come together in just 35 minutes, allowing even the busiest cooks to serve up a delightful meal without stress. Rich, Melty Cheese: The combination of provolone and mozzarella guarantees an indulgent, cheesy experience that everyone will love. Crowd-pleasing Appeal: Perfect for parties or family dinners, these subs are sure to be a hit with both kids and adults alike. Versatile Ingredients: Feel free to customize with your favorite meats or veggies, whether it’s grilled zucchini for a vegetarian twist or swapping in pepper jack for a spicy kick. Comfort Food Vibes: With the warm, toasty bread and savory fillings, these subs serve as the ultimate comfort food. For more delicious dish ideas, check out my Baked Cod Coconut and Baked Lemon Butter recipes!
Baked Italian Sub Sandwich Ingredients
For the Sandwich
• 4 sub rolls or hoagie buns – Provides the base for the sandwich; choose fresh for best results.
• 8 slices provolone cheese – Melting cheese foundation that adds creaminess and prevents sogginess. Substitute with mozzarella or cheddar for different flavors.
• 8 slices salami – Adds savory, rich flavor and a bit of spice; can substitute with turkey or omit for a vegetarian option.
• 8 slices ham – Contributes sweetness and depth; swaps well with smoked turkey or chicken.
• 8 slices pepperoni – Provides a classic Italian kick and robust flavor; use turkey pepperoni for a leaner version.
• ½ cup banana peppers, sliced – Adds tang and a bit of crunch; substitute with jalapeños for more heat.
• ½ cup black olives, sliced – Gives a briny, earthy element; can be omitted for a milder flavor.
• ¼ cup red onion, thinly sliced – Adds sweetness and color; use green onions for a milder taste.
For the Dressing
• ¼ cup Italian dressing – Enhances flavor with herbs; can substitute with vinaigrette or a homemade mix of olive oil and vinegar.
• 1 tsp Italian seasoning – Elevates flavors with herbs; can be substituted with dried oregano or basil.
For the Toppings
• ½ cup shredded mozzarella cheese – A second cheese layer that melts into gooey perfection; can be replaced with gouda or a cheese blend.
• 2 tbsp butter, melted – Adds richness and browning to the rolls; olive oil can be used as a healthier alternative.
• 1 clove garlic, minced – Infuses flavor without overpowering; can use garlic powder as a substitute.
These ingredients come together to form the delightful Baked Italian Sub Sandwiches that will surely wow your taste buds!
Step‑by‑Step Instructions for Baked Italian Sub Sandwiches
Step 1: Preheat the Oven
Begin by preheating your oven to 350°F (175°C). This ensures that your Baked Italian Sub Sandwiches will cook evenly and become beautifully golden. While the oven warms up, gather your baking sheet and line it with parchment paper for easy cleanup and to prevent sticking.
Step 2: Prepare the Rolls
Next, take your sub rolls or hoagie buns and slice them in half lengthwise. Place the halved rolls cut-side up on the prepared baking sheet, ensuring they have space between them for an even bake. This step sets the stage for layering delicious ingredients while allowing the rolls to crisp up nicely.
Step 3: Layer the Cheese
Now, lay 2 slices of provolone cheese on each roll bottom. The creamy provolone is essential for adding flavor and creating a delicious barrier that helps keep the rolls from getting soggy. Make sure the cheese covers the entire surface for maximum melty goodness.
Step 4: Add the Meats
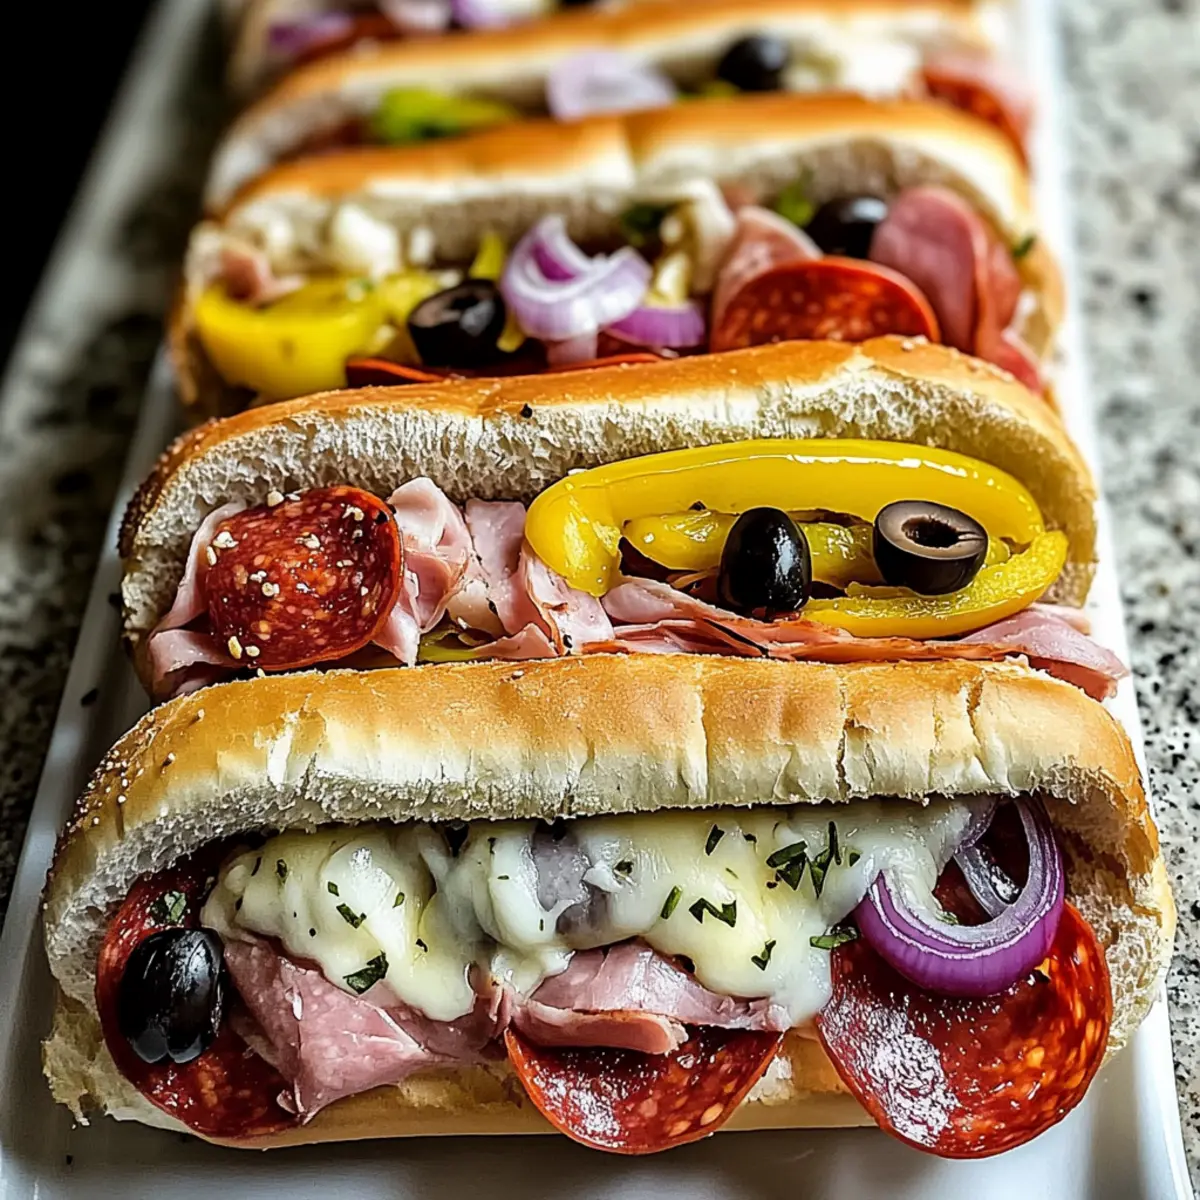
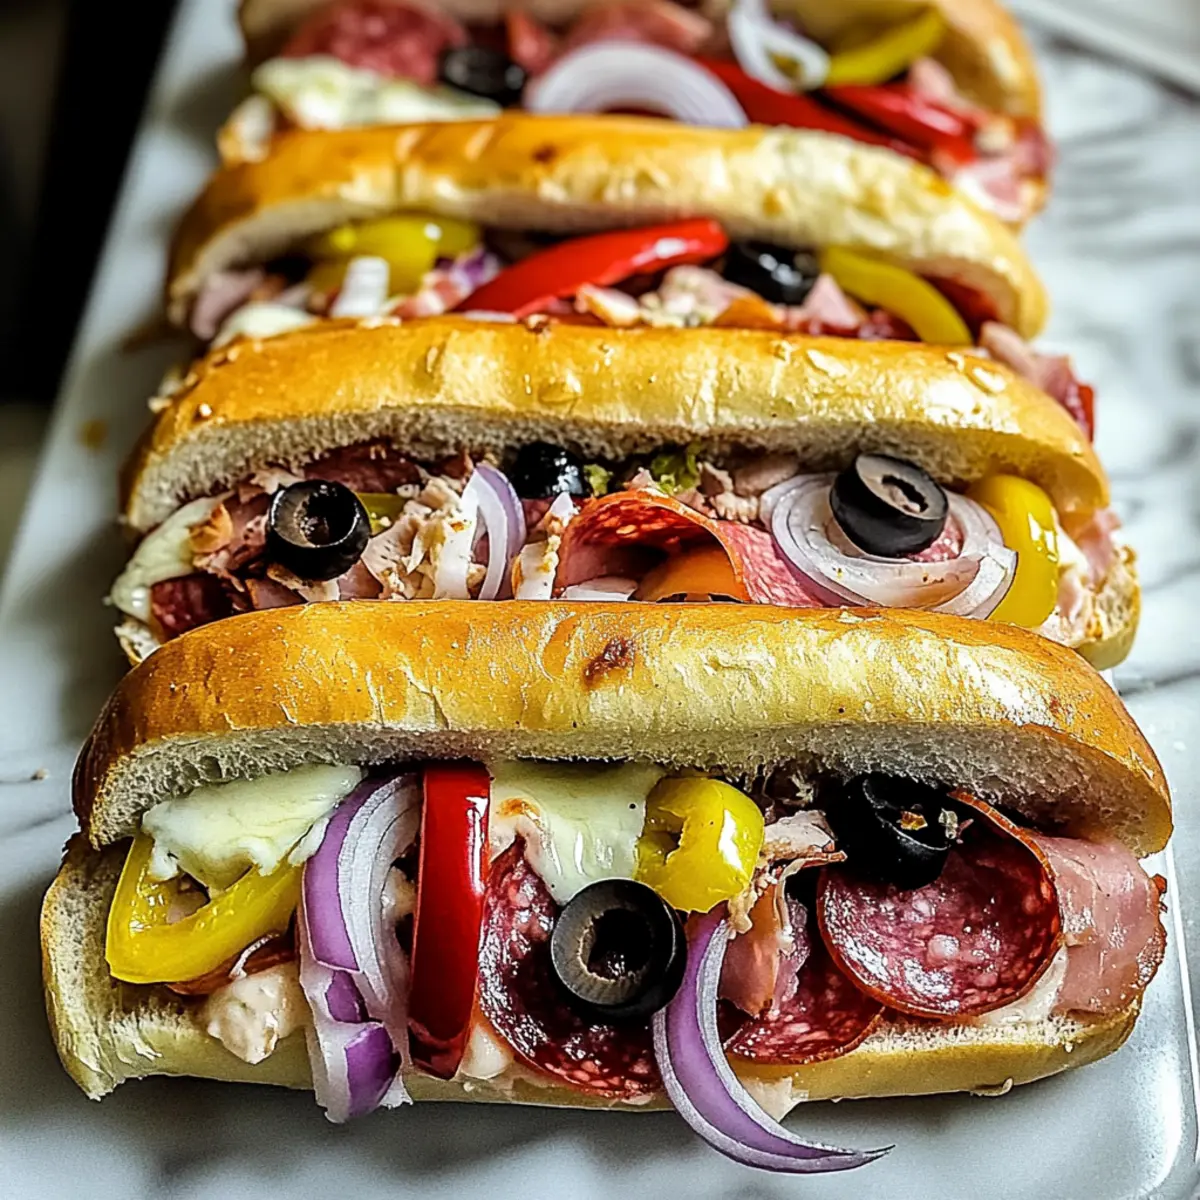
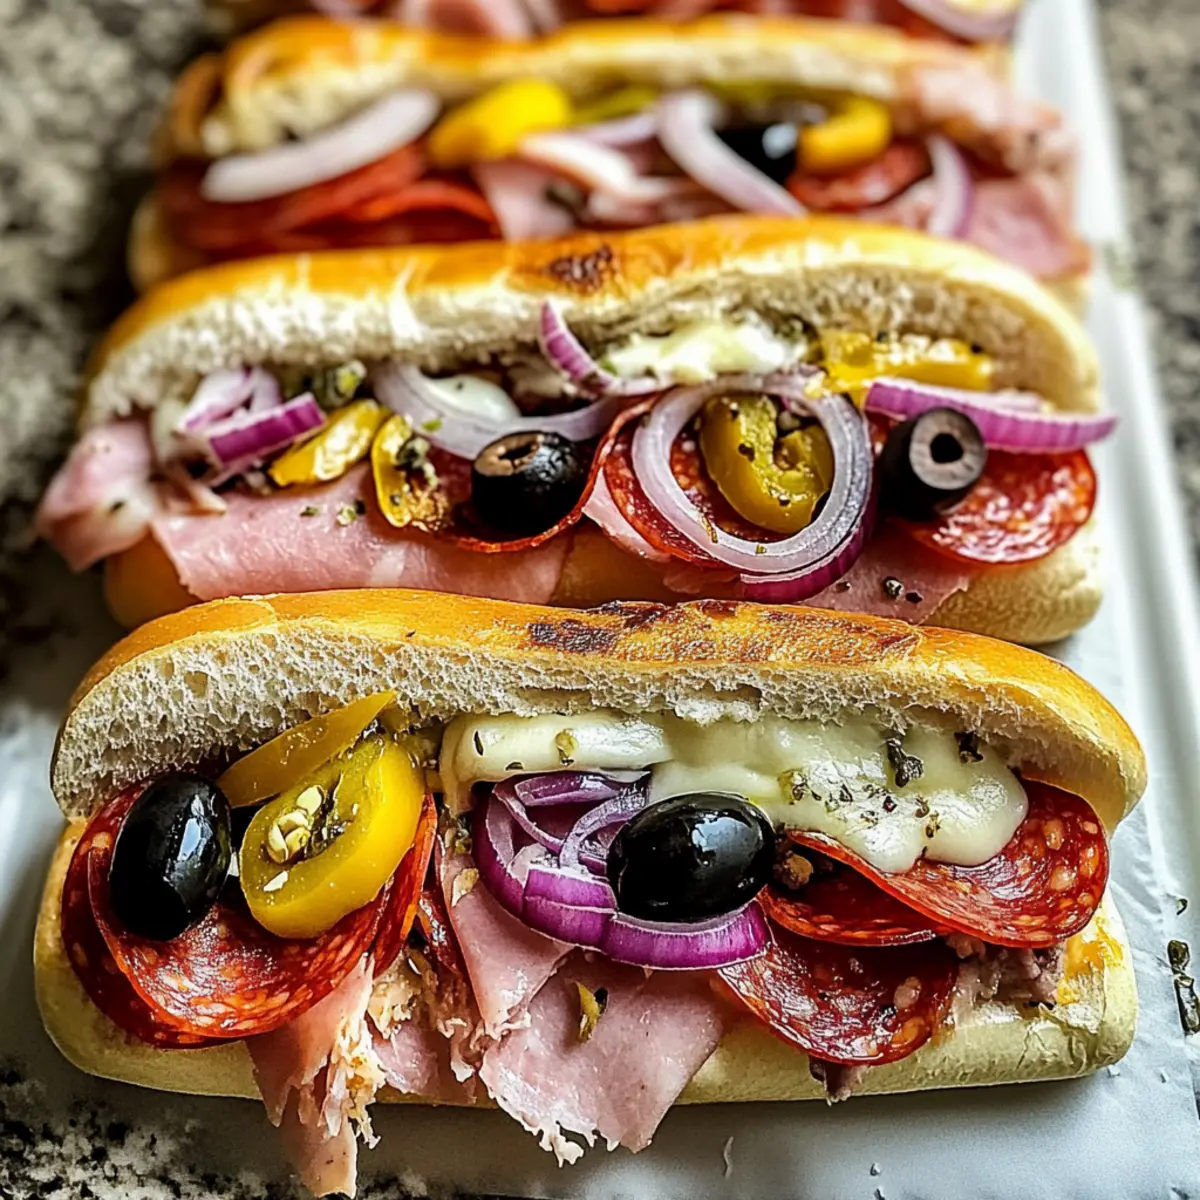
Evenly layer 8 slices each of salami, ham, and pepperoni over the provolone. This combination offers a rich, savory taste that makes these Baked Italian Sub Sandwiches truly satisfying. Ensure each roll gets an ample amount of meats, stacking them for a hearty bite with every mouthful.
Step 5: Top with Veggies
Distribute the sliced banana peppers, black olives, and red onion atop the meats. These vibrant veggies add a tangy crunch, enhancing the flavors of your subs. Make sure to sprinkle them evenly, so every bite delivers a delightful contrast to the savory meats and creamy cheese.
Step 6: Drizzle the Dressing
Generously drizzle Italian dressing over each sub, ensuring the vegetables and meats absorb those wonderful flavors. This step not only adds moisture but also elevates the overall taste of your Baked Italian Sub Sandwiches. The dressing will meld beautifully while baking, creating a mouthwatering experience.
Step 7: Sprinkle Shredded Cheese
Next, sprinkle the shredded mozzarella cheese over the entire top of the vegetable and meat layers. The mozzarella will melt into a gooey, delicious layer that binds the ingredients together. Be liberal with the cheese so every bite is packed with richness.
Step 8: Prepare Garlic Butter
In a small bowl, mix the melted butter, minced garlic, and Italian seasoning. This flavorful concoction will be the finishing touch for your sandwiches. The garlic butter will add depth and aroma, ensuring that your Baked Italian Sub Sandwiches are irresistible right from the oven.
Step 9: Brush the Rolls
Using a pastry brush, generously coat the top of each roll with the garlic butter mixture. This step infuses the bread with savory flavors and helps it achieve a beautiful golden-brown color during baking. Don’t skimp—this garlic butter is what makes the subs truly special.
Step 10: Top the Rolls
Add another slice of provolone cheese on top of each roll. This final layer of cheese will create the perfect melty topping that keeps everything together. It acts as a delicious crown for your mouthwatering sub, ensuring a satisfying bite every time.
Step 11: Compact the Sandwiches
Press the tops of the rolls firmly onto the bottoms to compact the sandwiches. This helps the layers meld together during baking, ensuring that each sub retains its form and flavor. A little pressure goes a long way in achieving that perfect sub experience.
Step 12: Bake the Sandwiches
Place the assembled sub sandwiches in the preheated oven and bake for 12-15 minutes. Watch closely for the cheese to melt and the tops to turn golden brown, indicating they are ready. Your Baked Italian Sub Sandwiches will now be transforming into a tantalizing meal.
Step 13: Cool and Slice
Once baked, allow your Baked Italian Sub Sandwiches to cool for a few minutes. This cooling time helps the cheese set, making slicing easier and preventing burns. After a brief wait, grab a sharp knife and cut each sub in half for an enticing presentation.
Step 14: Serve Immediately
Serve the subs while hot, either on their own or with a side of marinara sauce for dipping. The delightful aroma and enticing visuals will surely impress everyone at your table. Dive into these delectable Baked Italian Sub Sandwiches and savor every delicious bite!
What to Serve with Baked Italian Sub Sandwiches?
Elevate your dining experience with delicious sides and drinks that perfectly complement the flavors of these hearty subs.
- Creamy Coleslaw: A refreshing crunch balances the savory richness of the subs, making each bite a delightful experience.
- Garlic Breadsticks: With a satisfying chew and aromatic garlic, these are the perfect vessel for any leftover marinara sauce you may have.
- Caprese Salad: Fresh tomatoes, basil, and mozzarella provide a light counterpoint to the rich ingredients in the subs, delighting the palate.
- Zesty Pasta Salad: A cold pasta salad with Italian dressing ties in the sub’s flavors while providing an ideal contrast in temperature and texture.
- Marinara Sauce for Dipping: Enhance the sandwich experience with warm marinara, allowing for an extra layer of flavor in every bite.
- Sparkling Lemonade: A refreshing, citrusy drink that cuts through the richness of the subs and adds a bubbly zest to your meal.
- Potato Chips: A crunchy side that adds a satisfying texture; choose flavored chips for an extra punch that pairs well with the subs.
- Chocolate Chip Cookies: End your meal on a sweet note, with warm cookies that contrast the savory flavor of your Baked Italian Sub Sandwiches.
Make Ahead Options
These Baked Italian Sub Sandwiches are a fantastic choice for meal prep, allowing you to enjoy delicious homemade food even on your busiest days! You can assemble the sandwiches up to 24 hours in advance by layering the ingredients as instructed, then covering them tightly with plastic wrap and refrigerating. Just remember to wait to brush the garlic butter mixture on the tops until you’re ready to bake, as this will help maintain that delightful crispness. When it’s time to eat, preheat your oven and then bake the subs for 12-15 minutes until the cheese is melted and golden. Enjoy the same great taste with less effort during your week!
Baked Italian Sub Sandwiches Variations
Feel free to get creative and customize your Baked Italian Sub Sandwiches to suit your personal taste!
-
Spicy Twist: Add jalapeños or pepper jack cheese for a kick of heat that will tantalize your taste buds. The extra spice transforms the sandwich into a daring and exciting option.
-
Vegetarian Delight: Omit all meats and double the veggies! Grilling zucchini or eggplant can add a hearty texture and depth, making each bite both fresh and satisfying. Your vegetarian guests will appreciate this flavor-packed version.
-
Herbed Heaven: Mix fresh basil or parsley into your Italian dressing for an aromatic twist that brightens up the flavors. It infuses the subs with a touch of garden freshness, making each bite more invigorating.
-
Gourmet Cheese Swap: Instead of the usual provolone and mozzarella, try gouda or fontina for a richer flavor profile. These creamy cheeses melt beautifully and add a luxurious touch to your subs.
-
Crunchy Surprise: Add crispy bacon or chopped toasted nuts for an unexpected crunch. Bacon will introduce a smoky flavor, while nuts provide a delightful contrast to the soft bread.
-
Zesty Citrus: A splash of lemon juice or zest in the dressing will add a refreshing tang that perfectly balances the richness of the meats and cheese. This burst of brightness might just become your new favorite addition!
-
Mediterranean Flair: Include artichoke hearts, roasted red peppers, and feta cheese instead of the traditional fillings for a Mediterranean spin on the classic sub. These ingredients bring a new level of flavor and an adventure to your taste buds.
You might also enjoy pairing your delicious subs with a side of marinara sauce for dipping. And if you’re looking for more inspiration, don’t miss out on my Baked Cod Coconut and Baked Lemon Butter recipes!
Expert Tips for Baked Italian Subs
- Fresh Bread Selection: Ensure your sub rolls are fresh to avoid any sogginess after layering ingredients. Stale bread can lead to unappetizing subs.
- Cheese Layering: Layer cheese thoughtfully; provolone on the bottom helps create a barrier. This prevents the moisture from making the bread soggy while baking.
- Cool Before Slicing: Allow your Baked Italian Sub Sandwiches to cool briefly after baking. This helps the cheese set and avoids burning your mouth on the first bite.
- Herb Enhancement: Mixing fresh herbs with your Italian dressing can elevate flavors, making your subs even more tantalizing. Simple additions can make a big difference!
- Watch for Browning: Keep an eye on your sandwiches as they bake. The perfect golden-brown top means you have crispy, inviting subs ready to impress your family or guests.
How to Store and Freeze Baked Italian Sub Sandwiches
Fridge: Store leftovers in an airtight container for up to 3 days. This keeps the Baked Italian Sub Sandwiches fresh and allows for easy reheating.
Freezer: Wrap individual sandwiches tightly in plastic wrap and then in aluminum foil. They can be frozen for up to 3 months, making them a perfect make-ahead meal!
Reheating: For the best results, reheat frozen subs in the oven at 350°F (175°C) for 15-20 minutes. This method maintains the bread’s crunch and melts the cheese nicely.
Room Temperature: If you’re serving them as appetizers, you can leave the Baked Italian Sub Sandwiches at room temperature for up to 2 hours, but make sure to refrigerate any leftovers promptly.
Baked Italian Sub Sandwiches Recipe FAQs
How do I choose the best sub rolls for this recipe?
Absolutely! Look for fresh sub rolls or hoagie buns that are soft yet sturdy enough to hold all the delicious fillings. Ideally, the rolls should have a slightly crispy crust, which will help them stay intact while offering a delightful texture. If you’re in a pinch, you can also try using small baguettes or ciabatta rolls, as they add a unique twist to the classic sub.
What’s the best way to store leftover Baked Italian Sub Sandwiches?
To keep your leftover Baked Italian Sub Sandwiches fresh, place them in an airtight container and store them in the refrigerator for up to 3 days. This method retains their flavors and moisture while ensuring they’re ready for a quick reheat. Just remember to reheat them in the oven for the best results!
Can I freeze Baked Italian Sub Sandwiches?
Yes, you can absolutely freeze these sandwiches! Wrap each sub individually in plastic wrap and then in aluminum foil to prevent freezer burn. They can last for up to 3 months in the freezer. When you’re ready to enjoy, simply reheat them in the oven at 350°F (175°C) for 15-20 minutes. This keeps the bread toasty and the cheese melty!
What if my sub rolls become soggy after baking?
Very! To prevent sogginess, ensure that your ingredients are layered properly. Place cheese directly on the roll before adding any meats, which creates a moisture barrier. Also, avoid over-saturating with dressing—just a light drizzle will do! If trouble persists, consider using slightly stale bread or toasting the rolls lightly beforehand.
Are there any dietary considerations with this recipe?
Definitely! If you’re serving this recipe to someone with allergies, be mindful of ingredients like cheese, deli meats, and dressings, which may contain allergens such as dairy, gluten, or preservatives. For a vegetarian option, simply omit the meats and double the veggies, adding grilled zucchini or bell peppers for added flavor. Always check the labels of store-bought ingredients for allergens.
How should I serve these Baked Italian Sub Sandwiches?
For a lovely presentation, cut each sandwich in half and serve while still warm. These subs make a fantastic main dish and pair beautifully with a side of marinara sauce for dipping or a fresh garden salad. The more the merrier when it comes to sharing this delicious comfort food with friends and family!
Baked Italian Sub Sandwiches That Will Wow Your Taste Buds
Ingredients
Equipment
Method
- Preheat your oven to 350°F (175°C) and line a baking sheet with parchment paper.
- Slice the sub rolls in half lengthwise and place them cut-side up on the prepared baking sheet.
- Lay 2 slices of provolone cheese on each roll bottom.
- Layer 8 slices each of salami, ham, and pepperoni over the provolone.
- Distribute the sliced banana peppers, black olives, and red onion over the meats.
- Drizzle Italian dressing generously over each sub.
- Sprinkle shredded mozzarella cheese over the top of the vegetable and meat layers.
- Mix melted butter, minced garlic, and Italian seasoning in a small bowl.
- Brush the garlic butter mixture over the top of each roll.
- Add another slice of provolone cheese on top of each roll.
- Press the tops of the rolls onto the bottoms to compact the sandwiches.
- Bake for 12-15 minutes or until the cheese melts and tops are golden brown.
- Allow to cool briefly, then slice each sub in half for serving.
- Serve while hot, optionally with marinara sauce for dipping.
Leave a Reply