
The aroma of crisp, warm nori wafts through the kitchen, reminding me of a little sushi shop I once stumbled upon in Tokyo. This simple yet exciting recipe for Baked Salmon Sushi Cups transforms my love for sushi into a fun and easy-to-make appetizer that’s perfect for gatherings or cozy weeknight dinners. Combining tender salmon, perfectly seasoned sushi rice, and a crunchy exterior, these Baked Salmon Sushi Cups deliver an irresistible taste that will impress even the pickiest eaters. Plus, they’re TikTok viral for a reason! Not only do they come together swiftly, but they also add a delightful twist to traditional sushi that everyone can enjoy. Curious about making your own sushi-inspired snack at home? Let’s dive in!
Why are Baked Salmon Sushi Cups a must-try?
Quick to Make: These Baked Salmon Sushi Cups come together in no time, making them perfect for surprise guests or busy weeknights.
Flavor Explosion: The combination of tender salmon, zesty sriracha, and creamy Kewpie mayo creates a mouthwatering experience that sushi lovers will crave.
Crowd-Pleasing Appeal: Their charming presentation and familiar flavors are sure to make these cups a hit at any gathering, just like Gingerbread Cheesecake Cups or Sprinkle Cookie Cups.
Easily Customizable: Feel free to swap out the salmon for cooked shrimp or even incorporate veggies to suit different palettes. The sky’s the limit!
Healthy Indulgence: Enjoy a delicious meal that’s also packed with protein and omega-3 fatty acids thanks to the salmon, offering guilt-free satisfaction.
Baked Salmon Sushi Cups Ingredients
For the Filling
• Salmon – Choose fresh or frozen, cubed for a tender, flavorful base.
• Light Soy Sauce – Adds umami depth; use tamari for a gluten-free option.
• Kewpie Mayo – Brings creaminess and sweetness; substitute with regular mayo and a dash of rice vinegar.
• Sriracha – Provides a spicy kick; adjust to taste or swap with your favorite hot sauce.
• Sesame Oil – Infuses rich flavor; opt for toasted sesame oil for added depth.
For the Rice Blend
• Sushi Rice – The essential sticky base; do not replace with regular rice for best results.
• Rice Vinegar – Essential for seasoning; apple cider vinegar can be an alternative if needed.
• White Sugar – Balances rice vinegar’s acidity; adjust as desired for sweetness.
For the Cups
• Nori Sheets – Necessary for structure; ensure they fit your muffin tin size perfectly.
• Furikake – A delightful seasoning to finish; sesame seeds make a great substitute.
• Green Onion – Adds fresh flavor and garnish; omit if you prefer a milder taste.
• Cooking Spray – Prevents sticking; use any non-stick variety for hassle-free removal.
Enjoy these Baked Salmon Sushi Cups as a delightful appetizer or snack that impresses with every bite!
Step‑by‑Step Instructions for Baked Salmon Sushi Cups
Step 1: Cook Sushi Rice
Begin by cooking the sushi rice according to the package instructions, typically about 20 minutes on the stovetop. Once done, remove it from heat and gently fold in a mixture of rice vinegar and white sugar until well combined. Set the seasoned rice aside to cool while you prepare the salmon mixture, ensuring it holds its sticky texture for easy assembly later.
Step 2: Prepare Salmon Mixture
In a mixing bowl, combine the cubed salmon with light soy sauce, Kewpie mayo, sriracha, and sesame oil. Stir thoroughly to ensure the salmon is evenly coated and flavored. Let this luscious mixture rest for a few moments, allowing the flavors to meld together beautifully as you gather your other ingredients for the Baked Salmon Sushi Cups.
Step 3: Preheat Oven
Preheat your oven to 400°F (200°C) to prepare for baking. The hot oven will create the perfect environment for the cups to crisp up while ensuring the salmon cooks through deliciously. While the oven warms, take a moment to cut the nori sheets into appropriate squares or rectangles that will fit perfectly into your muffin tins, setting up for the next step.
Step 4: Cut Nori Sheets
Carefully slice the nori sheets into squares or rectangles, making sure they’ll fit snugly into the muffin tin molds. Aim for about 4×4 inch pieces to ensure they can cradle the filling well. Keep these ready alongside your salmon mixture and sushi rice, as assembly will come together quickly now that all elements are prepared.
Step 5: Assemble Cups
Spray a muffin tin generously with cooking spray to prevent sticking. Carefully place a piece of nori in each cup, creating a little bowl shape. Next, layer a spoonful of sushi rice into each nori cup, packing it gently but securely. Finally, top each cup with a generous scoop of the salmon mixture, ensuring even distribution for optimal flavor in every bite.
Step 6: Bake
Once assembled, place the muffin tin in the preheated oven and bake for about 15 minutes. Keep an eye on them as they bake; look for the salmon to become opaque and the nori to achieve a golden, crisp texture. The enticing aroma will fill your kitchen, signaling that your Baked Salmon Sushi Cups are almost ready to enjoy!
Step 7: Garnish and Serve
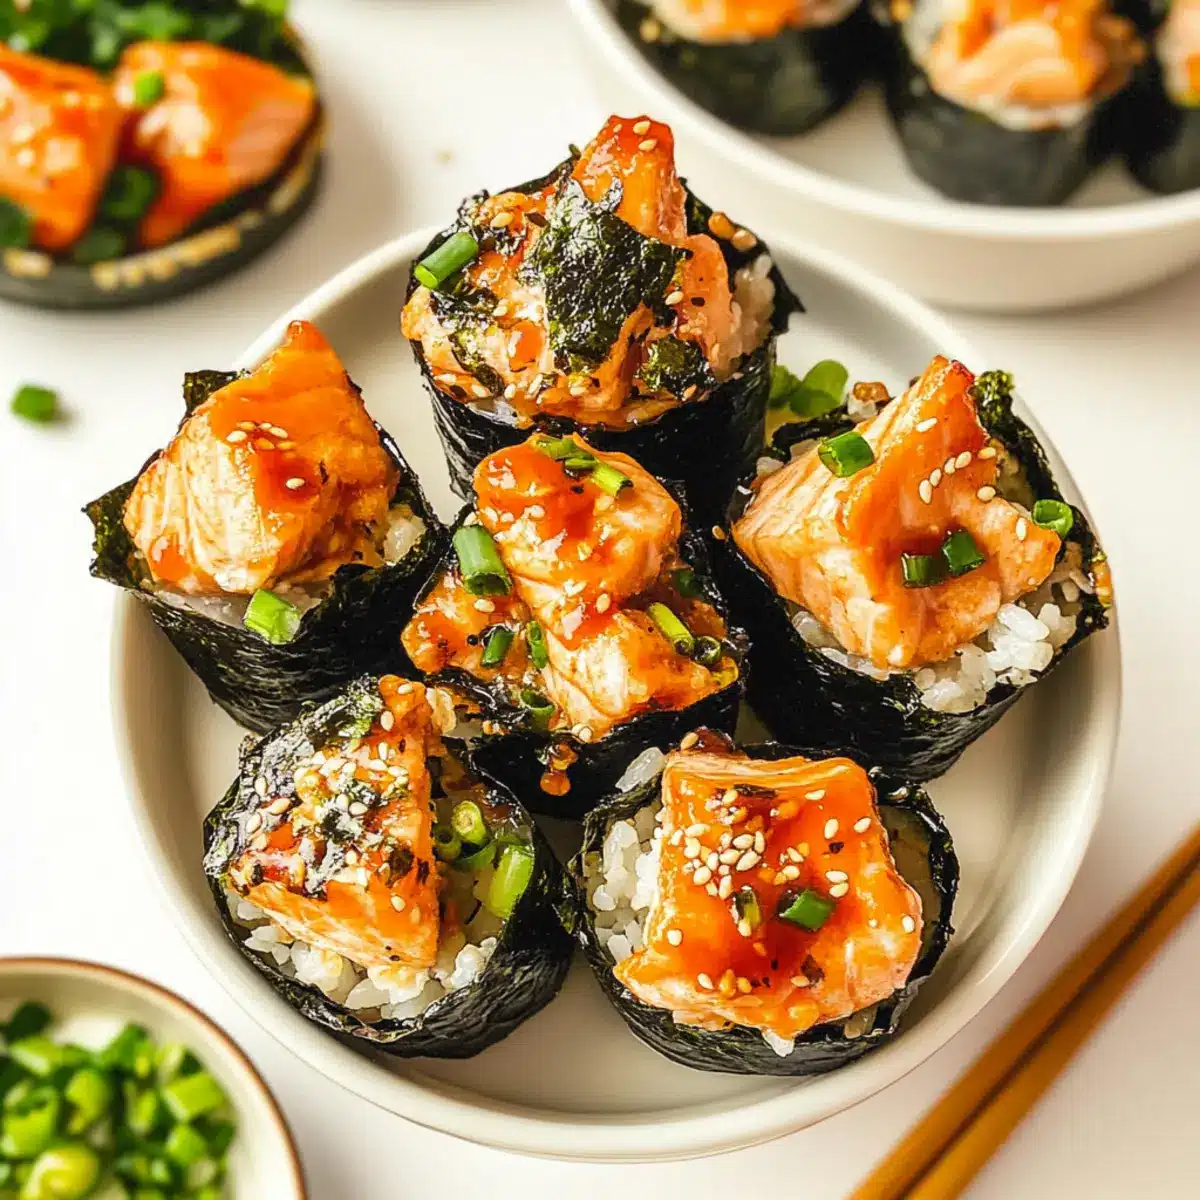
After baking, let the sushi cups cool for a few minutes. Drizzle with additional sriracha or spicy mayo, then sprinkle with furikake and chopped green onions for a fresh, vibrant finish. Serve these delightful Baked Salmon Sushi Cups warm as a delightful appetizer or snack that will surely impress your guests with both flavor and presentation.

Expert Tips for Baked Salmon Sushi Cups
-
Uniform Salmon Cubes: Cut the salmon into even cubes for consistent cooking. This ensures each bite is perfectly tender and avoids any overcooked pieces.
-
Monitor Baking Time: Keep a close eye on the baking process; you want the salmon to be just cooked through, slightly pink inside. Overbaking can lead to dry salmon in your Baked Salmon Sushi Cups.
-
Prevent Sticking: Use a non-stick muffin tin or spray it well with cooking spray. This will make removing the cups a breeze without tearing the nori.
-
Warm Toppings: Drizzle additional sriracha or spicy mayo while the cups are still warm. This helps the toppings adhere better and enhances their flavor.
-
Feel Free to Experiment: Don’t hesitate to swap out ingredients! Try using cooked shrimp or adding veggies like cucumber for a refreshing twist in your Baked Salmon Sushi Cups.
What to Serve with Easy Baked Salmon Sushi Cups
There’s nothing quite like a delicious spread to elevate your sushi-inspired evening!
- Pickled Ginger: A traditional accompaniment that provides a refreshing palate cleanser between bites of savory sushi cups.
- Soy Sauce: Essential for dipping, this savory sauce enhances the umami flavors in every mouthful, adding depth to your tasting experience.
- Wasabi: Add a touch of heat with this spicy condiment, offering an exciting kick that pairs beautifully with the salmon’s richness.
- Miso Soup: A warm bowl of miso soup complements the sushi cups perfectly, creating a comforting, traditional Japanese meal.
- Sushi Rolls: Serve alongside your baked sushi cups for a fun, deconstructed sushi experience that delights friends and family alike.
- Edamame: Light and healthy, steamed edamame brings a tender crunch and additional protein to balance the flavors of the meal.
- Cucumber Salad: A refreshing cucumber salad with sesame dressing adds a crisp and vibrant touch, perfect for a light contrast to the warm sushi cups.
- Sake or Green Tea: For drinks, a chilled sake beautifully complements the sushi’s flavors, while green tea provides a soothing, fragrant beverage option.
- Mochi Ice Cream: For dessert, consider serving delightful mochi ice cream, offering a sweet end to your sushi-inspired feast that’s sure to impress!
Make Ahead Options
These Baked Salmon Sushi Cups are a fantastic choice for meal prep, saving you precious time during busy weeknights! You can prepare the sushi rice and salmon mixture up to 24 hours in advance. Simply cook the sushi rice and mix it with rice vinegar and sugar, then store it in the refrigerator. For the salmon filling, combine the cubed salmon, soy sauce, Kewpie mayo, sriracha, and sesame oil in an airtight container, ensuring it remains flavorful. When you’re ready to serve, assemble the cups by layering nori, sushi rice, and salmon mixture in your muffin tin, then bake for about 15 minutes. You’ll enjoy the same delightful taste just as if they were freshly made!
Baked Salmon Sushi Cups Variations
Feel free to explore these exciting twists on the classic Baked Salmon Sushi Cups!
-
Seafood Swap: Substitute salmon with cooked shrimp or imitation crab for a different flavor. Add a zing of lemon to brighten the taste!
-
Veggie Delight: Incorporate shredded carrots, diced cucumbers, or avocado into the salmon mixture for a crunchy texture. Each bite bursts with freshness!
-
Heat Levels: Adjust the spiciness by increasing or decreasing the sriracha. For a milder flavor, try a sweet chili sauce instead.
-
Gluten-Free Option: Use tamari in place of light soy sauce to keep these delicious cups gluten-free. Enjoy the same umami richness without compromise.
-
Different Sauces: Experiment with teriyaki or eel sauce for a sweeter flavor profile. Your taste buds will dance with excitement!
-
Layered Flavors: Add cream cheese to the salmon mixture for extra creaminess. It complements the flavors beautifully while adding a delicious twist.
-
Crunchy Topping: Top the sushi cups with panko breadcrumbs before baking for an added crunch. Once golden, they’ll make the perfect finishing touch!
-
Herb Infusion: Mix in fresh herbs such as dill or cilantro into the salmon for an aromatic lift. Your guests will love the fresh herb flair!
Don’t forget to pair these with pickled ginger and wasabi for that authentic sushi experience! If you’re looking for other delightful appetizers, check out our Smoked Salmon Crostini or a unique take on fish with our Baked Cod Coconut. Enjoy customizing your Baked Salmon Sushi Cups!
How to Store and Freeze Baked Salmon Sushi Cups
Fridge: Store leftover Baked Salmon Sushi Cups in an airtight container for up to 2-3 days. They’re best enjoyed fresh but can be refrigerated for snacking later.
Freezer: To freeze, let the cups cool completely, then place them in a single layer in an airtight container or freezer bag. They can be frozen for up to 2 months.
Reheating: Reheat baked cups in a preheated oven at 350°F (175°C) for about 10-15 minutes until warm and crispy again. Microwaving is also an option but may result in softer nori.
Assembly Tip: If preparing ahead, store the rice and salmon mixture separately from the nori until ready to bake, ensuring the nori stays crisp.

Baked Salmon Sushi Cups Recipe FAQs
What type of salmon is best for Baked Salmon Sushi Cups?
Absolutely! I recommend using either fresh or frozen salmon, cubed. Fresh salmon gives a delightful flavor and texture, while frozen salmon is a convenient option that works beautifully when properly thawed.
How should I store leftover Baked Salmon Sushi Cups?
For best results, store your leftover Baked Salmon Sushi Cups in an airtight container in the refrigerator for up to 2-3 days. This keeps them fresh and ready for a quick snack or meal. Just remember, they’re best enjoyed right after making!
Can I freeze Baked Salmon Sushi Cups?
Yes, you can! First, let the cups cool completely. Then, place them in a single layer in an airtight container or freezer bag. They can be frozen for up to 2 months. When you’re ready to enjoy them, simply reheat in a preheated oven at 350°F (175°C) for about 10-15 minutes until warmed through and crispy.
What should I do if my nori sheets are too soft?
The more the merrier! If your nori sheets are soft or flimsy, you can lightly toast them over a low flame or in a dry skillet for a few seconds to help retain their crispness. It’s a quick fix that makes them perfect for holding the sushi cups together!
Are there any dietary modifications I should know about?
Absolutely! If you or your guests have allergies or dietary restrictions, you can easily swap ingredients. For example, use tamari instead of light soy sauce for a gluten-free version, and incorporate cooked shrimp or vegetables like cucumber for a pescatarian-friendly alternative. Always double-check all labels if allergies are a concern.

Delicious Baked Salmon Sushi Cups for Easy Party Pleasing
Ingredients
Equipment
Method
- Cook sushi rice according to package instructions, about 20 minutes. Mix rice vinegar and white sugar into cooked rice and set aside to cool.
- In a bowl, combine cubed salmon with light soy sauce, Kewpie mayo, sriracha, and sesame oil. Mix thoroughly and let rest.
- Preheat oven to 400°F (200°C). Cut nori sheets into 4x4 inch pieces.
- Place nori sheets into muffin tin molds to form cups.
- Layer sushi rice into nori cups, followed by a scoop of salmon mixture. Pack gently.
- Bake in preheated oven for about 15 minutes until salmon is cooked and nori is crisp.
- Let cool slightly, garnish with additional sriracha or spicy mayo, furikake, and green onions before serving.
Leave a Reply