
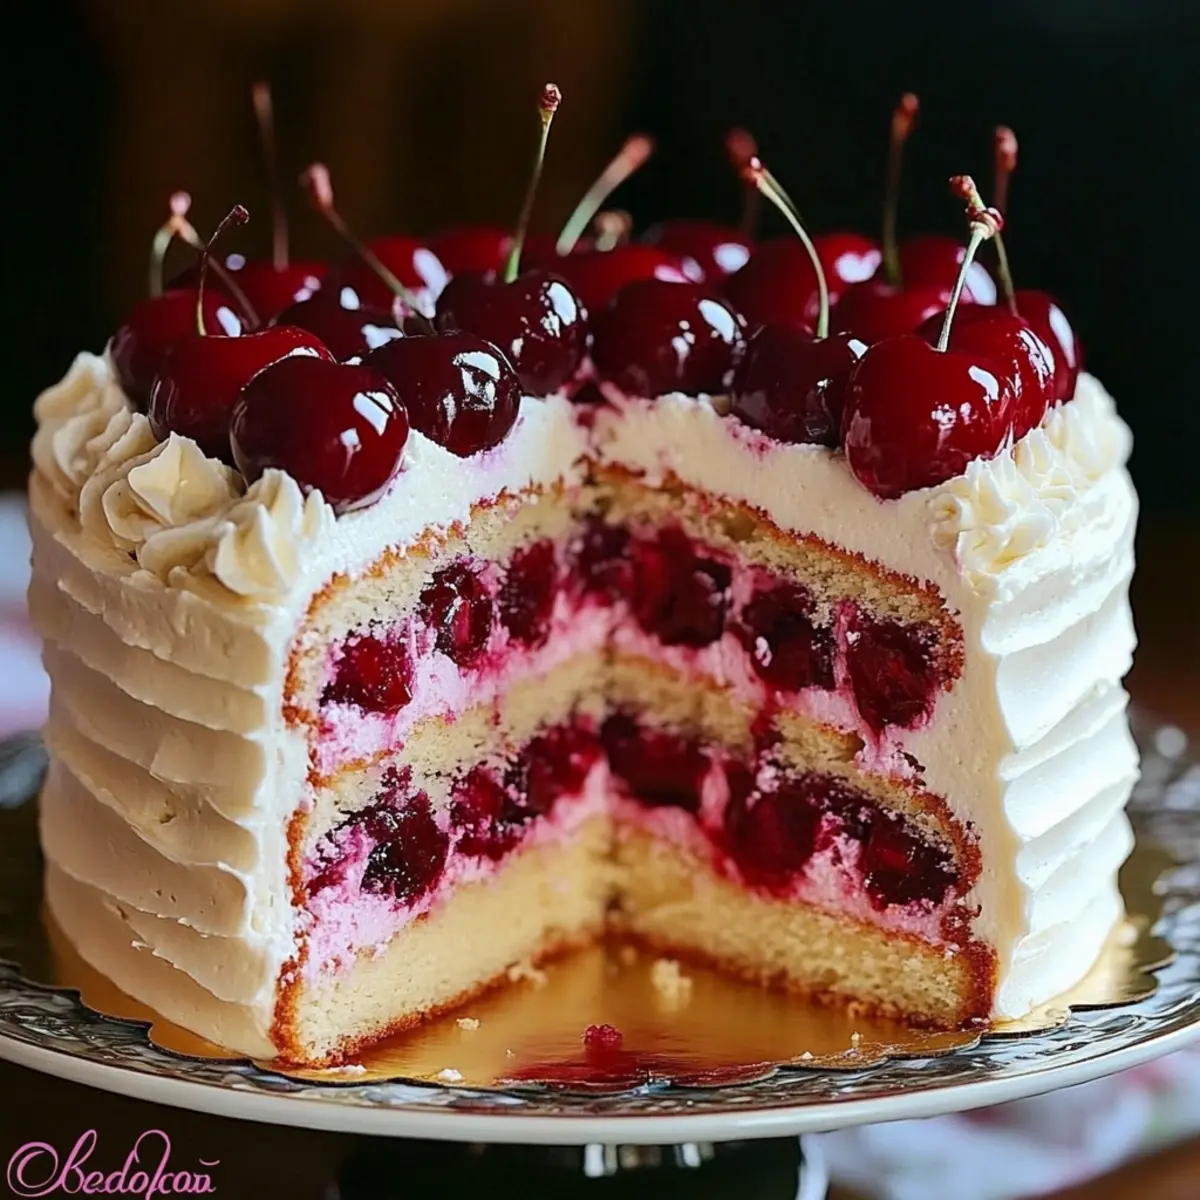
There’s something truly magical about the first bite of a homemade Cherry Layer Cake with Cherry Cream Cheese Frosting. The combination of sweet, succulent cherries nestled between fluffy vanilla layers takes me back to sun-soaked summer picnics, filled with laughter and joy. This delightful cake is not only a feast for the senses but is also surprisingly quick to prepare, making it perfect for both casual gatherings and special celebrations. Plus, the luscious cherry cream cheese frosting adds a delightful twist that elevates this dessert to a showstopper, while providing a creamy contrast to the tart cherries. Ready to bring a slice of nostalgia to your kitchen? Let’s dive into this irresistible recipe!
Why is this Cherry Layer Cake special?
Delightful Layers: The delicate vanilla layers are fluffy and perfectly complement the juicy cherries, creating a harmonious balance of flavor.
Indulgent Frosting: The creamy cherry cream cheese frosting adds a rich, tangy finish that makes every bite heavenly.
Easy Preparation: Whipping up this stunning dessert is simple, perfect for even the most novice bakers looking to impress.
Versatile Delight: Serve it at gatherings or for a casual afternoon treat; it’s guaranteed to be a crowd-pleaser that sparks joy. If you love fruity desserts, be sure to check out my Mini Lemon Cheesecakes for another delectable option!
Memorable Flavors: Each forkful brings back memories of summer picnics and celebrations, infusing your day with warmth and nostalgia.
Cherry Layer Cake Ingredients
• To create your dreamy Cherry Layer Cake with Cherry Cream Cheese Frosting, gather these key ingredients!
For the Cake
- All-Purpose Flour – Provides the structure needed for light, airy layers ideal for a stunning cake.
- Baking Powder – Essential for achieving that fluffy rise; a must-have for delightful cake texture.
- Salt – Balances the sweetness and enhances the rich flavor of the cake.
- Unsalted Butter – Adds moisture and richness; be sure to cream it with sugar until fluffy!
- Granulated Sugar – Sweetens the cake while helping it achieve a tender crumb texture.
- Eggs – Binds everything together, adding both structure and a touch of richness.
- Vanilla Extract – Elevates flavors with its warm notes, making each bite more aromatic.
- Whole Milk (or Buttermilk) – Keeps the cake moist; buttermilk adds a delightful tang that marries beautifully with cherries.
- Cherries (Fresh, Frozen, or Canned) – The star ingredient that provides juicy bursts of flavor and vibrant color to your cake.
For the Frosting
- Cream Cheese – The base of your frosting, offering a tangy kick that balances the sweet cherries.
- Powdered Sugar – Creates a smooth, melt-in-your-mouth texture for the frosting.
- Heavy Cream (Optional) – Lightens the frosting’s texture for that perfect whipped consistency.
Now that you have the ingredients, let the cherry-infused bliss begin!
Step‑by‑Step Instructions for Cherry Layer Cake with Cherry Cream Cheese Frosting
Step 1: Preheat and Prepare Pans
Begin by preheating your oven to 350°F (175°C). While it’s heating, prepare three 8-inch round cake pans by greasing them with unsalted butter and lining the bottoms with parchment paper. This ensures that your Cherry Layer Cake layers will slide out easily after baking, providing a smooth assembly for your delightful dessert.
Step 2: Mix Dry Ingredients
In a medium bowl, whisk together the all-purpose flour, baking powder, and salt. In a separate large mixing bowl, cream the softened unsalted butter and granulated sugar using an electric mixer on medium speed until light and fluffy, about 3-5 minutes. This step is crucial—creating a fluffy texture that forms the foundation of your Cherry Layer Cake.
Step 3: Add Eggs and Vanilla
Next, beat in the eggs one at a time, ensuring they are fully incorporated before adding the next. Then, mix in the vanilla extract until well combined. This mixture should appear smooth and creamy, a perfect complement to the fruity cherries that will brighten up your lovely layers.
Step 4: Combine Wet and Dry Ingredients
Gradually alternate adding the flour mixture and the whole milk (or buttermilk) to the butter mixture, starting and ending with the flour mixture. Mix on low speed until just combined, being careful not to overmix. This will ensure a tender cake texture that perfectly showcases the tart cherries nestled between the layers of cake.
Step 5: Bake the Cake Layers
Divide the batter evenly among the prepared pans, smoothing the tops with a spatula for a uniform appearance. Bake in the preheated oven for 22-27 minutes, or until a toothpick inserted into the center comes out clean. The cakes should have a light golden color and spring back when gently pressed in the center.
Step 6: Cool the Cakes
Let the cakes cool in the pans for about 10 minutes. Then, carefully turn them out onto a wire rack to cool completely. Ensure the layers are completely cool before frosting; this will prevent the frosting from melting and sliding off, allowing your Cherry Layer Cake with Cherry Cream Cheese Frosting to shine beautifully.
Step 7: Prepare the Cherry Filling
If you’re using fresh or frozen cherries, combine them in a saucepan with a sprinkle of sugar and a squeeze of lemon juice. Simmer over medium heat for 10-15 minutes, or until the mixture thickens slightly. Allow the cherry filling to cool while you prepare the frosting for added ease during assembly.
Step 8: Make the Cream Cheese Frosting
In a mixing bowl, beat the cream cheese until smooth, using an electric mixer. Gradually add the powdered sugar, mixing until fluffy and well combined. For an airy texture, fold in the chopped cherries or the cooled cherry filling, ensuring an even distribution of flavor in this rich frosting.
Step 9: Assemble the Cake
To assemble your Cherry Layer Cake, place one layer on a serving plate and spread a generous layer of frosting on top. Spoon some of the cherry filling over the frosting, then repeat this process for the second layer. Place the final cake layer on top, and spread the remaining frosting over the top and sides of the cake, creating a lovely finish.
Step 10: Decorate and Serve
Optionally, decorate the top of your frosted Cherry Layer Cake with whole cherries for a picturesque presentation. Slice and serve with delight, and if desired, pair it with a scoop of vanilla ice cream or a glass of bubbly rosé for a wonderful treat. This cake is sure to be the star of any gathering!
Expert Tips for Cherry Layer Cake
-
Cool Completely: Always let your cake layers cool completely before frosting to avoid melty mishaps that can ruin your beautiful Cherry Layer Cake with Cherry Cream Cheese Frosting.
-
Choose Fresh Cherries: Opt for fresh cherries when possible, as they provide the best flavor. If using canned cherries, reduce added sugar to avoid excess sweetness.
-
Don’t Overmix: When combining wet and dry ingredients, mix just until combined. Overmixing can lead to a dense cake instead of lovely, fluffy layers.
-
Make a Frosting Dam: Use extra frosting around the edge of each cake layer before adding the cherry filling. This helps contain the filling and prevents spillage during slicing.
-
Flavor Boost: Incorporate some cherry juice in the frosting for a more vibrant/cherry-forward flavor, enhancing the overall taste experience of your cake.
-
Prep Ahead: Bake the cake layers a day in advance and store them tightly wrapped in the fridge or freezer. Assemble the cake closer to serving for maximum freshness.
What to Serve with Cherry Layer Cake with Cherry Cream Cheese Frosting
Looking to create a delightful dining experience? Complement your cherry-infused masterpiece with these fabulous pairings!
-
Vanilla Ice Cream: The creamy sweetness of vanilla ice cream contrasts beautifully with the tart cherries, enhancing each decadent bite.
-
Bubbly Rosé: A chilled glass of rosé adds a refreshing sparkle, perfectly balancing the cake’s rich flavors while adding a celebratory touch.
-
Whipped Cream: Light and airy whipped cream offers a delightful texture contrast that perfectly complements the layers of cake and frosting.
-
Chocolate Ganache: Drizzling warm, rich chocolate ganache over a slice creates an indulgent flavor combination that chocolate lovers will adore.
-
Fresh Berries: Serve with a medley of fresh berries to brighten each plate with vibrant colors and a fresh contrast to the sweet cake.
-
Coffee or Tea: A comforting cup of coffee or tea provides warmth and depth, enhancing the cake’s flavors while inviting leisurely conversation.
-
Lemonade: A refreshing glass of lemonade, either sweetened or tart, creates a lovely pairing that cuts through the richness of the frosting.
-
Fruit Salad: A light fruit salad made with seasonal fruits refreshes the palate, and its natural sweetness pairs well with the cake’s cherries.
Make Ahead Options
These Cherry Layer Cake with Cherry Cream Cheese Frosting are perfect for busy home cooks looking to save time! You can bake the cake layers up to 24 hours in advance; just make sure to wrap them tightly in plastic wrap once they cool completely to prevent drying out. The cherry filling can be prepared up to 3 days ahead as well; store it in an airtight container in the refrigerator to keep it fresh. When you’re ready to serve, simply whip up the cream cheese frosting, assemble the cake layers with the filling and frosting, and you’ll have a stunning dessert that tastes just as delicious as when it was freshly made!
How to Store and Freeze Cherry Layer Cake
Fridge: Keep the Cherry Layer Cake in an airtight container in the refrigerator for up to 5 days to maintain freshness and flavor.
Freezer: For longer storage, wrap the unassembled cake layers tightly in plastic wrap and foil, then freeze for up to 3 months. Frost once thawed for the best texture.
Leftover Filling: Any extra cherry filling can be stored in an airtight container in the fridge for up to 4 days—warm it up before drizzling over slices when serving.
Reheating: If you prefer a warm slice, microwave individual pieces for about 10-15 seconds until slightly warmed; this enhances the luscious flavors of the Cherry Layer Cake with Cherry Cream Cheese Frosting.
Cherry Layer Cake with Cream Cheese Frosting Variations
Feel free to personalize your Cherry Layer Cake with these delightful twists and substitutions that cater to your unique tastes!
- Gluten-Free: Replace the all-purpose flour with a 1:1 gluten-free blend to enjoy this cake without gluten.
- Dairy-Free: Swap in vegan butter and plant-based cream cheese, and use non-dairy milk for a deliciously dairy-free dessert.
- Different Frosting: Try a luscious vanilla buttercream or a light whipped cream frosting for a fresh take on the classic cherry flavor.
- Add Zest: Incorporate lemon or orange zest into the cake batter to brighten the flavors, creating a citrusy contrast with the cherries.
- Chocolate Lover’s Twist: Mix in chocolate chips or layer chocolate ganache between the cake layers for a delightful chocolate-cherry combination.
- Fruit Fusion: Combine cherries with other berries like raspberries or strawberries; this fruity medley adds depth and vibrant color to each slice.
- Spice It Up: Add a pinch of cinnamon or nutmeg to the cake batter for a warm, aromatic twist that pairs beautifully with the cherries.
- Fruity Frosting: Enhance the cream cheese frosting with pure cherry juice to intensify the cherry flavor while giving it a stunning hue.
If you’re in the mood for even more sweet inspiration, don’t forget to check out my No Bake Gingerbread Cheesecake Cups for a delightful treat perfect for any occasion!
Cherry Layer Cake with Cherry Cream Cheese Frosting Recipe FAQs
How can I tell if my cherries are ripe?
Absolutely! When selecting cherries, look for ones that have a deep, rich color and a firm texture. Ripe cherries should be plump and glossy, without any dark spots or wrinkles. If you’re using fresh cherries, give them a gentle squeeze; they should be slightly soft but not mushy.
How do I store leftover Cherry Layer Cake?
The Cherry Layer Cake can be stored in an airtight container in the refrigerator for up to 5 days. To keep it fresh and prevent it from drying out, ensure that it is well-covered. You can also place a piece of plastic wrap directly on the frosting before sealing the container for extra protection.
Can I freeze Cherry Layer Cake?
Very! To freeze the Cherry Layer Cake, first wrap each unassembled cake layer tightly in plastic wrap, then cover it with aluminum foil. This will protect the layers from freezer burn and keep them fresh for up to 3 months. When you’re ready to enjoy it, thaw the layers in the refrigerator overnight before frosting. For best texture, frost the cake after it has thawed.
What should I do if my cake is too dense?
If your cake turns out denser than expected, it might be due to overmixing the batter. To avoid this, mix your wet and dry ingredients just until combined. If you find your cake has already baked dense, you can try slicing it into layers and adding extra frosting and cherry filling to turn it into a beautiful layer cake!
Are there any dietary concerns with this recipe?
Very! This recipe contains common allergens such as gluten and dairy. If making it for those with dietary restrictions, consider substituting a gluten-free flour blend for a gluten-free option. For a dairy-free version, you can use vegan butter, plant-based cream cheese, and non-dairy milk, ensuring everyone can enjoy a slice of this delicious Cherry Layer Cake with Cherry Cream Cheese Frosting!
How long can I keep leftover cherry filling?
You can store any leftover cherry filling in an airtight container in the refrigerator for up to 4 days. Simply warm it up before drizzling over slices of cake when serving for a delightful touch of flavor!
Irresistible Cherry Layer Cake with Cream Cheese Frosting
Ingredients
Equipment
Method
- Preheat your oven to 350°F (175°C) and prepare three 8-inch round cake pans by greasing them with unsalted butter and lining the bottoms with parchment paper.
- Whisk together the all-purpose flour, baking powder, and salt in a medium bowl. Cream the softened unsalted butter and granulated sugar until light and fluffy in a separate large bowl.
- Beat in the eggs one at a time and mix in the vanilla extract until smooth.
- Gradually alternate adding the flour mixture and the whole milk (or buttermilk) to the butter mixture, mixing on low speed until just combined.
- Divide the batter among the prepared pans and bake for 22-27 minutes or until a toothpick comes out clean.
- Let the cakes cool in the pans for about 10 minutes before transferring them to a wire rack to cool completely.
- If using fresh or frozen cherries, combine them in a saucepan with sugar and lemon juice, then simmer for 10-15 minutes until thickened.
- Beat the cream cheese until smooth, then gradually mix in the powdered sugar until fluffy. Fold in the chopped cherries or cooled cherry filling.
- Assemble the cake by spreading frosting on each layer and adding cherry filling before stacking.
- Optionally decorate the top with whole cherries and serve.
Leave a Reply