
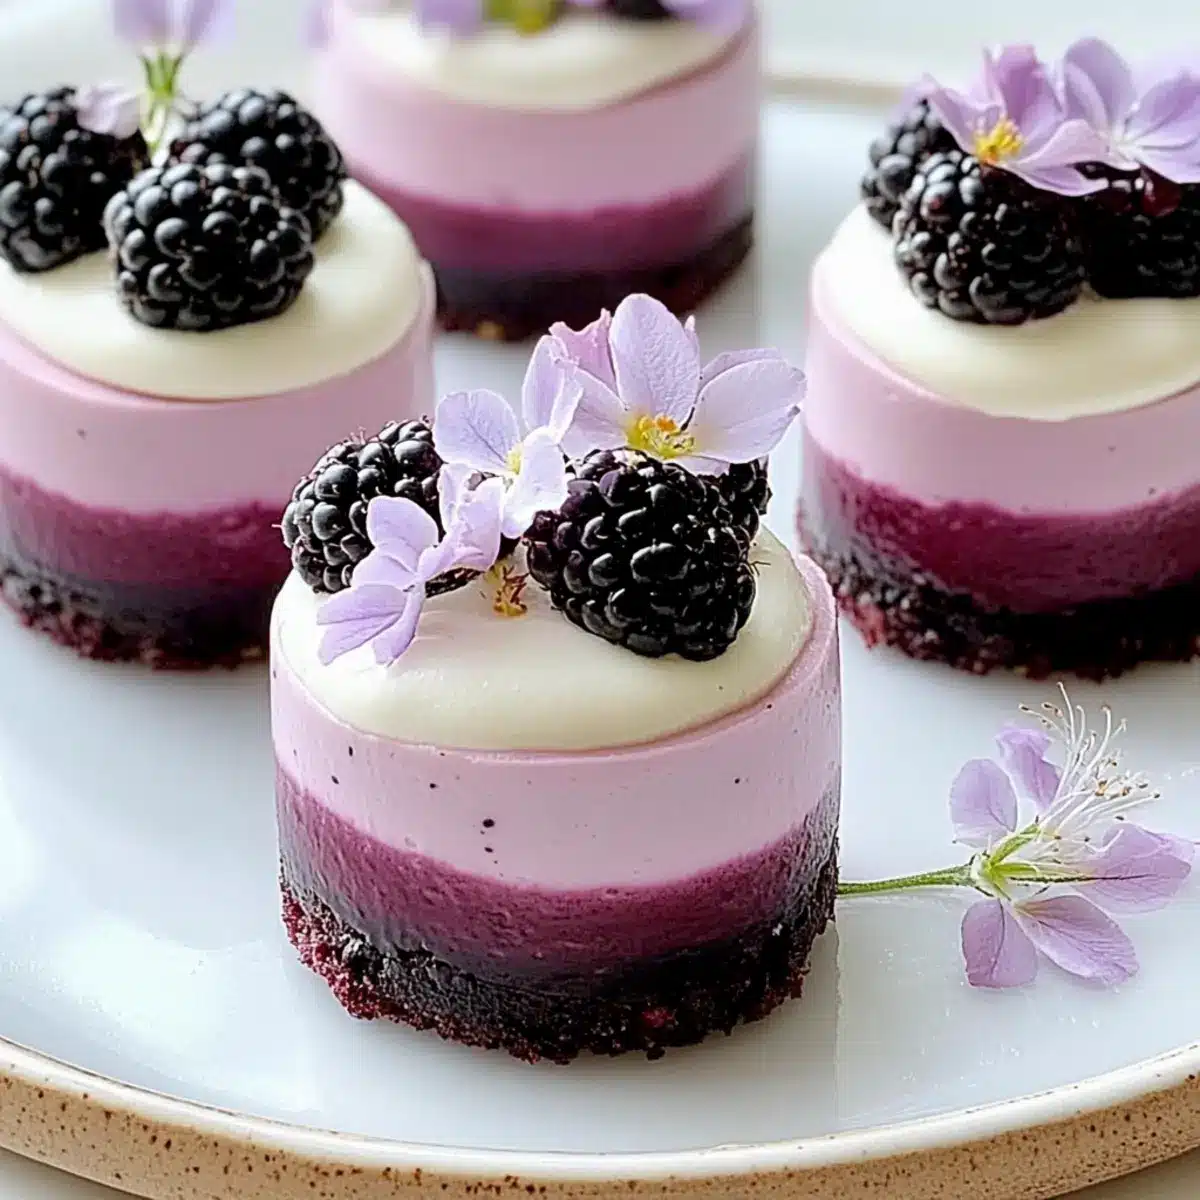
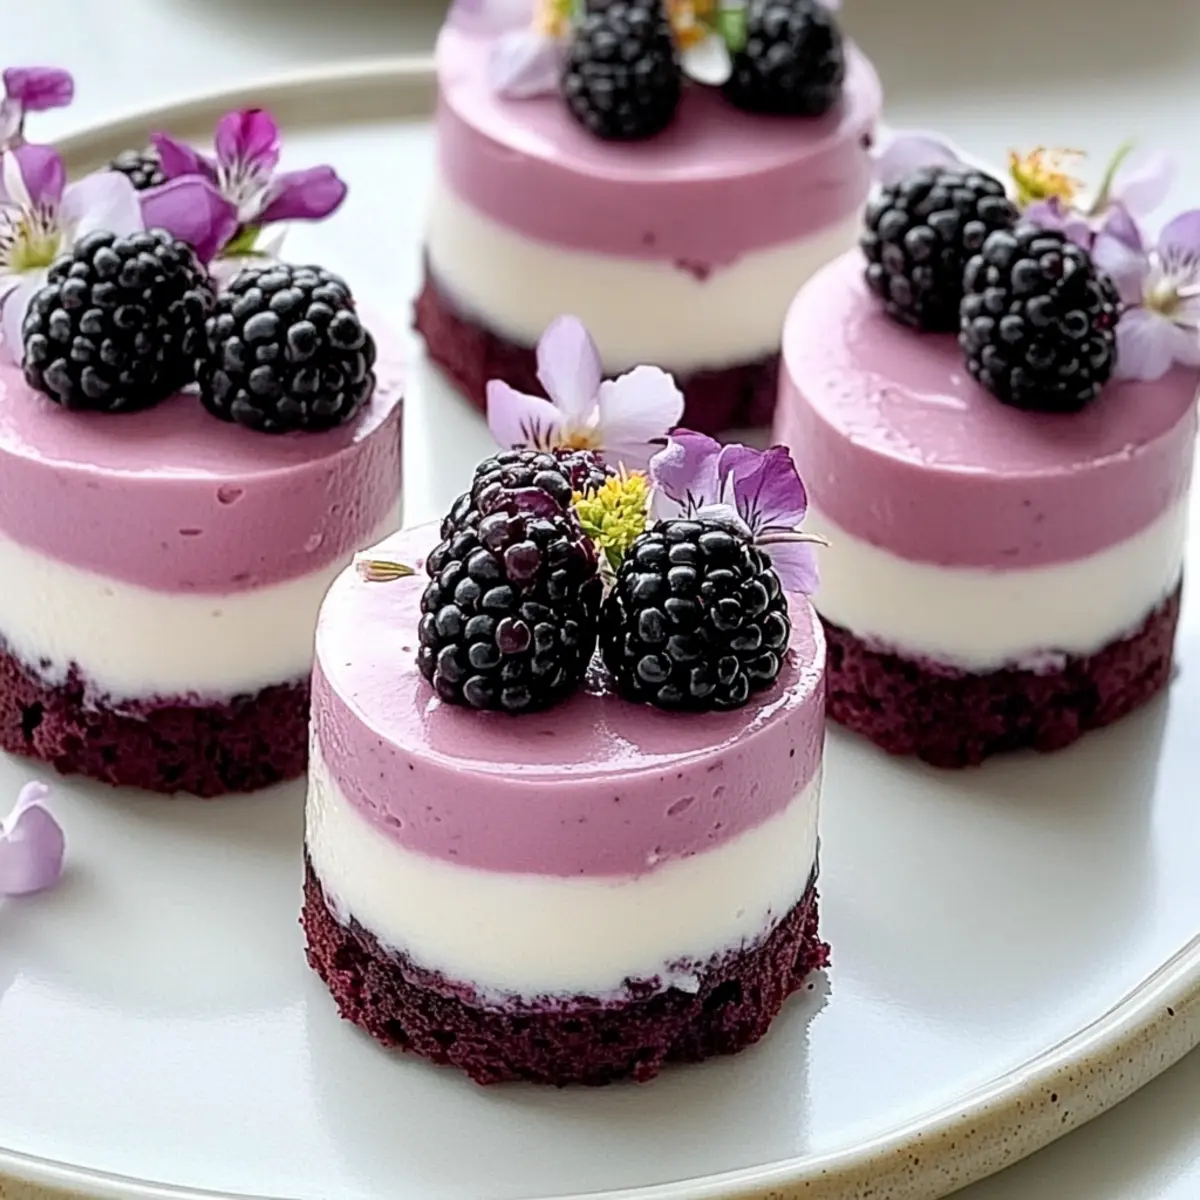
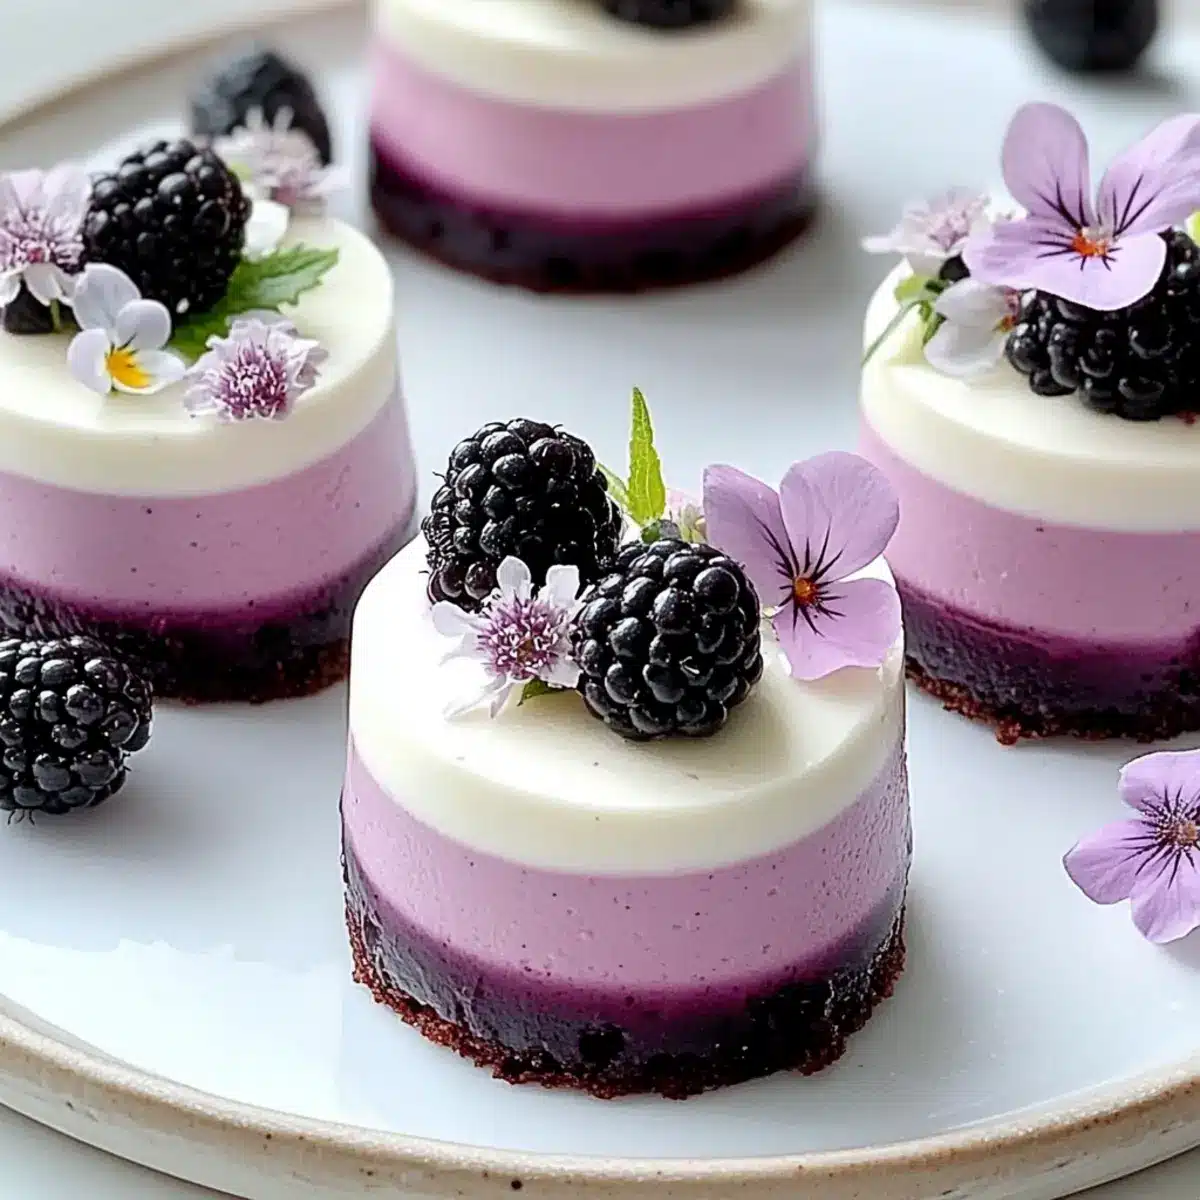
As I took my first bite of these Mini Blackberry Mousse Cakes, I was transported to a quaint café tucked away in a Parisian alley, where every dessert feels like a work of art. These no-bake wonders are not only visually stunning but also a joy to make—perfect for when you want to impress without spending hours in the kitchen. Each cake combines luscious blackberry flavor and rich white chocolate, all nestled in a crispy cookie crust, making them a light yet indulgent treat. Ideal for gatherings or a simple sweet escape on a cozy afternoon, they’ll definitely become a favorite go-to dessert. Curious how to create this elegant delight? Let’s dive in!
Why are Mini Blackberry Mousse Cakes irresistible?
Decadent Flavor: The vibrant blackberry and rich white chocolate blend creates a taste sensation that dances on your palate.
Effortless Elegance: With a no-bake method, you can channel your inner chef without spending all day in the kitchen.
Visual Appeal: These mini masterpieces are as stunning as they are delicious, making them perfect for impressing guests at any gathering.
Textural Delight: Experience the perfect contrast between the smooth, airy mousse and the crunchy cookie base in each heavenly bite.
Versatile Treat: Ideal for various occasions, from tea parties to casual family dinners, everyone will love these charming desserts!
Once you’ve tried these, you might also enjoy a light and zesty Mini Lemon Cheesecakes or a tangy Cranberry Mousse Pie to keep those sweet cravings satisfied!
Mini Blackberry Mousse Cakes Ingredients
For the Crust
- Chocolate Sandwich Cookies – The base structure for the crust, providing flavor and crunch; use gluten-free varieties if needed.
- Unsalted Butter – Binds the cookie crumbs together to create a sturdy crust; can substitute with coconut oil for a dairy-free option.
For the Mousse
- Fresh or Frozen Blackberries – The main fruit component for the mousse, offering vibrant flavor; frozen blackberries work well, but ensure to strain after cooking for a smooth purée.
- Sugar – Sweetens the mousse; can substitute with honey or agave for a different sweetness.
- Water – Assists in cooking the blackberries and helps blend into a purée.
- Lemon Juice – Adds acidity to balance sweetness; can replace with lime juice for a unique tang.
- Gelatin – Provides stability and structure to the mousse, necessary for setting; substitute with agar for a vegan version.
- Heavy Cream – Creates the airy texture of the mousse when whipped; use coconut cream as a dairy-free alternative.
- Vanilla Extract – Enhances flavor depth in the mousse.
For the Glaze
- White Chocolate Chips – The base for the smooth glaze, adding richness; chop a white chocolate bar as a substitute.
- Heavy Cream (for glaze) – Creates a silky texture and adds richness to the glaze.
These Mini Blackberry Mousse Cakes are not just a dessert; they are a delightful experience that will transport you to a world of elegance and indulgence. Enjoy crafting them!
Step‑by‑Step Instructions for Mini Blackberry Mousse Cakes
Step 1: Prepare the Crust
In a mixing bowl, combine crushed chocolate sandwich cookies with melted unsalted butter. Stir until the mixture resembles wet sand, then press it firmly into silicone or ring molds, creating an even layer. Place the molds in the freezer for about 15 minutes, allowing the crust to firm up and hold its shape nicely.
Step 2: Cook the Blackberries
In a saucepan, combine fresh or frozen blackberries with sugar and water over medium heat. Stir occasionally until the blackberries break down, approximately 5-7 minutes. Once cooked, blend the mixture until smooth and strain it through a fine mesh sieve to remove any seeds, resulting in a silky blackberry purée.
Step 3: Incorporate the Gelatin
In a small bowl, bloom the gelatin by sprinkling it over lemon juice and letting it sit for a few minutes. Then, gently warm the gelatin mixture until dissolved, before mixing it into the warm blackberry purée. Allow this mixture to cool to room temperature while you prepare the next component of your Mini Blackberry Mousse Cakes.
Step 4: Whip the Cream
In a separate bowl, whip the heavy cream until soft peaks form, using a whisk or electric mixer on medium speed. This process takes about 3-5 minutes. Once ready, gently fold in the vanilla extract and cooled blackberry-gelatin mixture, taking care to maintain the airy texture for a light and fluffy mousse.
Step 5: Assemble the Mousse Cakes
After the crusts have set, pour the luscious blackberry mousse over the chilled cookie bases in the molds. Use a spatula to smooth the tops evenly. Place the assembled Mini Blackberry Mousse Cakes in the refrigerator for at least 4 hours, or until the mousse is fully set and has a firm texture.
Step 6: Prepare the White Glaze
To create the silky white chocolate glaze, heat a small saucepan over low heat and pour in the heavy cream. Once hot, pour it over white chocolate chips in a heatproof bowl and let sit for a few minutes. Stir the mixture gently until completely smooth and glossy, allowing it to cool slightly before glazing the mousse cakes.
Step 7: Glaze and Decorate
Once the mousse has set, carefully remove the cakes from the molds and place them on a plate. Drizzle the cooled white glaze over each cake, allowing it to cascade down the sides. For a final touch, sprinkle fresh blackberries and edible flowers on top just before serving, adding a beautiful pop of color to your Mini Blackberry Mousse Cakes.
Storage Tips for Mini Blackberry Mousse Cakes
- Fridge: Keep the mousse cakes in an airtight container for up to 3 days. This ensures they remain fresh and maintain their delightful texture.
- Freezer: Avoid freezing the mousse cakes after glazing, as this can compromise their delicate texture and appearance. Instead, freeze the unglazed mousse for up to 2 months.
- Reheating: There’s no need to reheat these cakes; simply remove from the fridge and enjoy them chilled, preserving the refreshing experience of the Mini Blackberry Mousse Cakes.
- Serving: For best results, consume within 24 hours of preparation for optimal freshness and flavor.
What to Serve with Mini Blackberry Mousse Cakes?
Perfectly paired sides elevate this exquisite dessert experience to new heights.
-
Fresh Berries: A medley of raspberries, blueberries, and strawberries adds brightness and enhances the fruity elements of the mousse. Their vibrant colors also create an inviting presentation.
-
Whipped Cream: A dollop of lightly sweetened whipped cream provides a creamy contrast to the airy mousse, enhancing the indulgent feel while maintaining a balanced lightness.
-
Mint Leaves: A few fresh mint leaves offer a refreshing twist and aromatic kick, beautifully complementing the berry flavors with their cool essence.
-
Cheese Platter: A selection of soft cheeses like brie or goat cheese pairs well, providing a savory contrast to the sweetness of the mousse cakes and adding depth to your dessert spread.
-
Sparkling Wine or Champagne: A chilled glass of sparkling wine refreshes the palate and adds a celebratory feel, making your dessert experience all the more special—perfect for those elegant gatherings.
-
Chocolate Drizzle: A decadent drizzle of dark chocolate sauce serves as a rich contrast to the light mousse, enhancing the chocolatey crust while adding a dose of luxury.
-
Lemon Sorbet: This light and zesty sorbet cleanses the palate between bites of the mousse cakes, while the citrusy tang refreshes your taste buds after the sweetness.
-
Almond Biscotti: Crunchy almond biscotti brings a delightful texture contrast, perfect for those who enjoy both mousse and something crisp to nibble alongside.
These pairings will not only enhance the overall experience but also add layers of flavor, making your Mini Blackberry Mousse Cakes the star of any celebration!
Expert Tips for Mini Blackberry Mousse Cakes
-
Silicone Molds: Use silicone molds for easy unmolding; they ensure a smooth finish and help retain the shape of your Mini Blackberry Mousse Cakes.
-
Gelatin Care: Ensure the gelatin is fully dissolved in the warm blackberry purée for the best texture, avoiding any lumps in your mousse.
-
Cooling Glaze: Let the white chocolate glaze cool to a lukewarm temperature before applying it to the mousse; this prevents melting and maintains the elegance of your dessert.
-
Garnish Smartly: Add fresh blackberries and edible flowers right before serving for the best visual impact and to keep everything looking fresh and beautiful.
-
No Freezing: Avoid freezing the mousse cakes after glazing, as this can affect the delicate texture and appearance; refrigerate instead!
Mini Blackberry Mousse Cakes Variations
Feel free to unleash your creativity and tailor these delightful cakes to your taste!
-
Vegan Alternative: Swap gelatin for agar-agar and use plant-based cream and chocolate for a delicious vegan treat.
-
Flavor Fusion: Substitute blackberries with raspberries or strawberries for a different fruity experience; each fruit brings its unique twist!
-
Citrus Surprise: Add a layer of lemon curd between the mousse and crust for a burst of zesty flavor that perfectly complements the sweetness.
-
Extra Crunch: Mix in chopped nuts, like almonds or hazelnuts, into the crust for an added layer of texture and a wholesome crunch.
-
Spiced Touch: Introduce a pinch of cinnamon or nutmeg into the mousse for a warm spiced intrigue that elevates the overall flavor profile.
-
Chocolate Lovers: Drizzle some melted dark chocolate over the glaze for a richer chocolate flavor; it’s a decadent addition that chocolate aficionados will adore.
-
Herbal Infusion: Incorporate fresh mint or basil into the mousse for a refreshing herbal note that beautifully contrasts the sweetness.
For those who love exploring new desserts, don’t forget to check out these delightful options: the elegant Mini Lemon Cheesecakes or the rich and dreamy Triple Chocolate Mousse to keep your dessert-making journey exciting!
Make Ahead Options
These Mini Blackberry Mousse Cakes are perfect for busy home cooks looking to save time! You can prepare the cookie crust and refrigerate it for up to 3 days in advance, ensuring a sturdy base that won’t lose its crunch. The blackberry mousse can be made up to 24 hours before serving—just follow the regular preparation steps and refrigerate until set. To maintain quality, store the assembled cakes in an airtight container, and wait to glaze them until just before serving to keep that silky finish intact. When you’re ready to enjoy, simply pour the cooled white glaze over the mousse and garnish with fresh blackberries for an elegant touch.

Mini Blackberry Mousse Cakes Recipe FAQs
What should I look for when selecting blackberries?
Absolutely! When selecting blackberries, look for plump, shiny berries that are deep purple-black in color. Avoid any with dark spots or mold, as they may be overripe. If using frozen blackberries, ensure they are well-sealed to prevent freezer burn and thaw them properly before cooking.
How should I store leftover mousse cakes?
Very! To store leftover Mini Blackberry Mousse Cakes, keep them in an airtight container in the refrigerator. They will stay fresh for up to 3 days. For optimal flavor and texture, try to consume them within 24 hours of preparation.
Can I freeze the mousse cakes?
Definitely! While it’s best not to freeze the fully glazed mousse cakes due to potential texture changes, you can freeze the unglazed mousse for up to 2 months. To do this, prepare the mousse, pour it into the crust, but hold off on glazing. Cover tightly and place in the freezer. When ready to enjoy, thaw in the fridge overnight before glazing and serving.
What if my mousse doesn’t set properly?
If your mousse isn’t setting properly, the most common issue may relate to the gelatin. Make sure that it was fully bloomed and dissolved before mixing it into the blackberry purée. If the mixture was too warm when you added the gelatin, it might not firm up correctly. A good tip is to create a double batch or double-check the packaged gelatin instructions for best results!
Are Mini Blackberry Mousse Cakes suitable for those with dietary restrictions?
Of course! These Mini Blackberry Mousse Cakes can easily cater to various dietary needs. To make them vegan, substitute gelatin with agar-agar, and use plant-based cream and chocolates. If you have nut allergies or are gluten-sensitive, make sure to select appropriate brands for your chocolate cookies and creams. Always check ingredient labels to ensure they meet your dietary preferences!
How long will the mousse last after serving?
I recommend that these delightful treats be consumed within 24 hours of preparation for the best flavor and freshness. However, if stored properly in the refrigerator, they can remain tasty for up to 3 days. Just ensure to keep them covered to avoid absorbing any fridge odors!
Delightful Mini Blackberry Mousse Cakes You Can No-Bake!
Ingredients
Equipment
Method
- In a mixing bowl, combine crushed chocolate sandwich cookies with melted unsalted butter. Stir until the mixture resembles wet sand, then press it firmly into silicone or ring molds, creating an even layer. Place the molds in the freezer for about 15 minutes.
- In a saucepan, combine fresh or frozen blackberries with sugar and water over medium heat. Stir occasionally until the blackberries break down, approximately 5-7 minutes. Blend the mixture until smooth and strain through a fine mesh sieve.
- In a small bowl, bloom the gelatin by sprinkling it over lemon juice. Gently warm until dissolved, then mix into the warm blackberry purée. Allow this to cool to room temperature.
- In a separate bowl, whip the heavy cream until soft peaks form, then gently fold in the vanilla extract and the cooled blackberry-gelatin mixture.
- After the crusts have set, pour the blackberry mousse over the chilled cookie bases in the molds. Smooth the tops evenly and refrigerate for at least 4 hours.
- To create the glaze, heat heavy cream, pour it over white chocolate chips, and let sit before stirring until smooth. Allow to cool slightly.
- Remove the cakes from molds, drizzle the glaze over each cake, and garnish with fresh blackberries and edible flowers just before serving.
Leave a Reply