
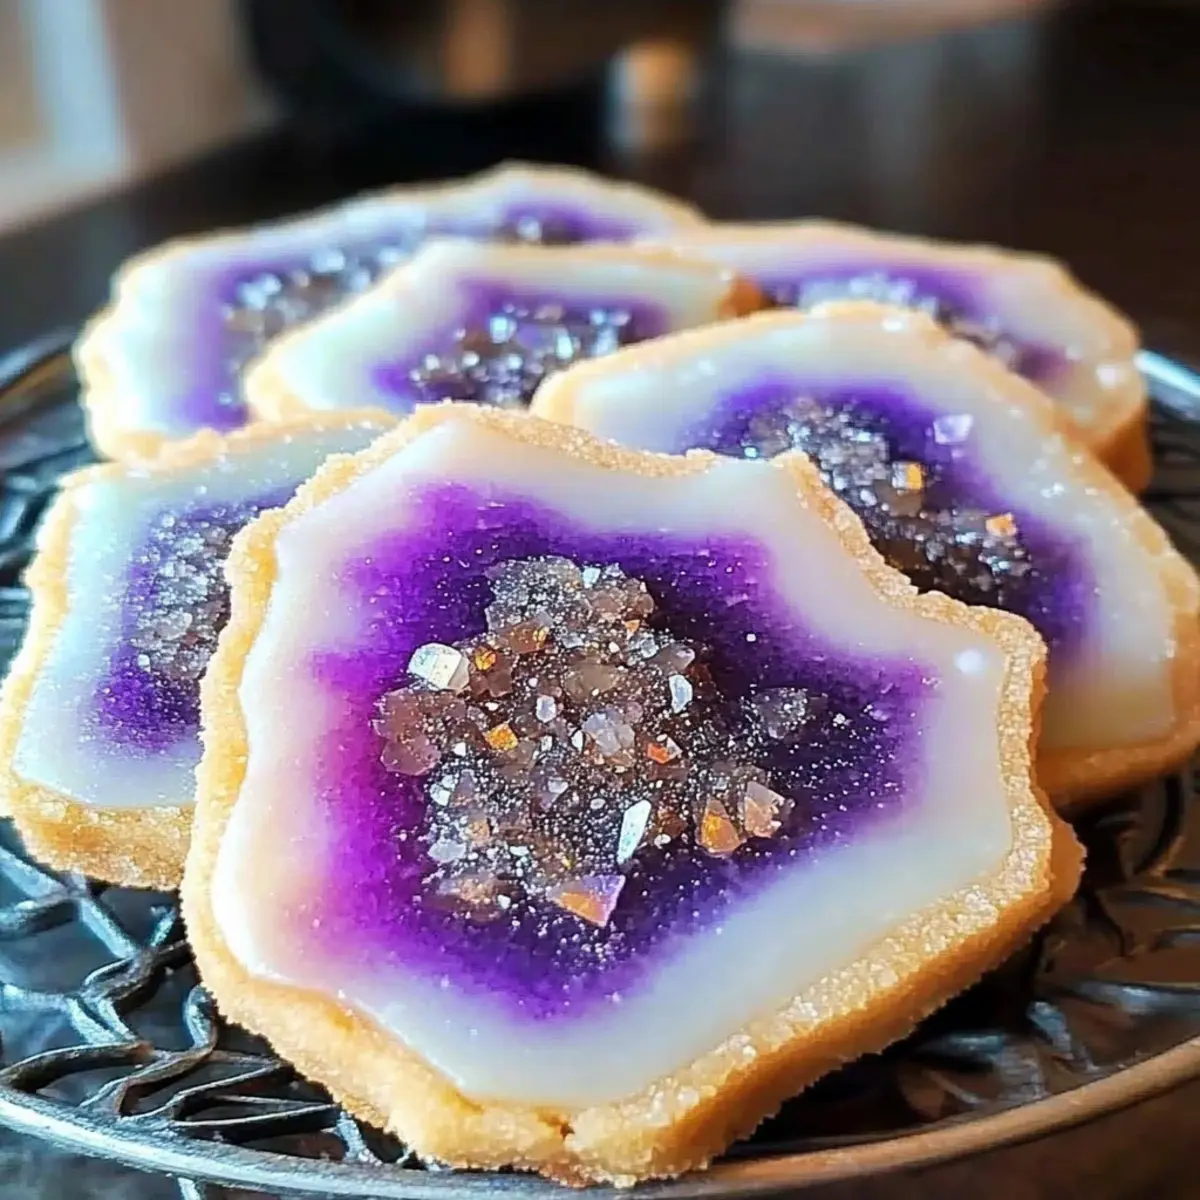
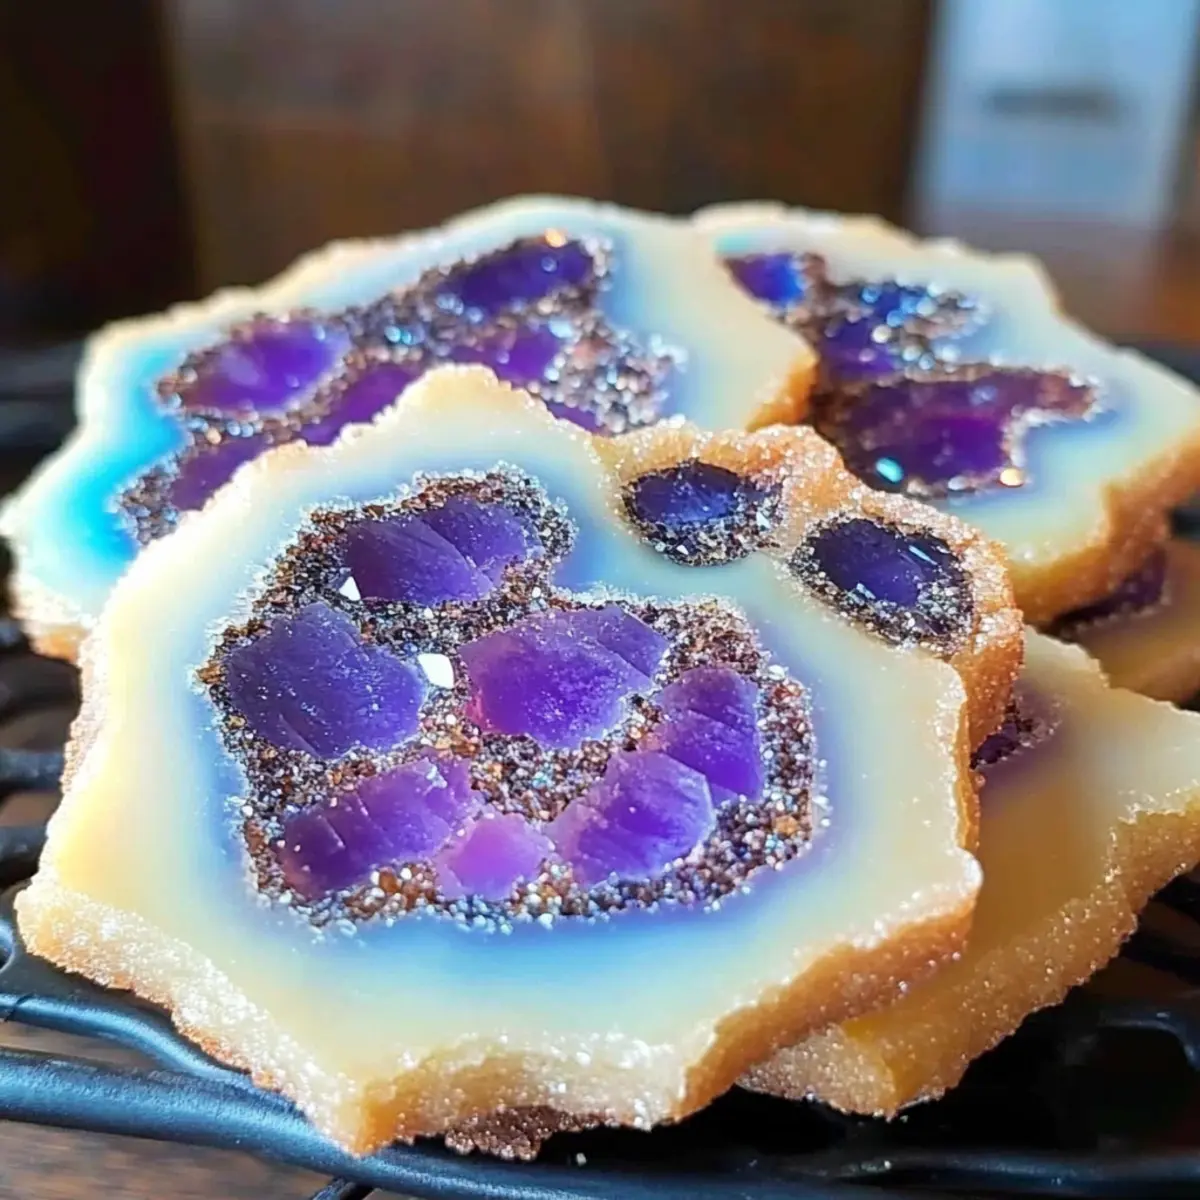
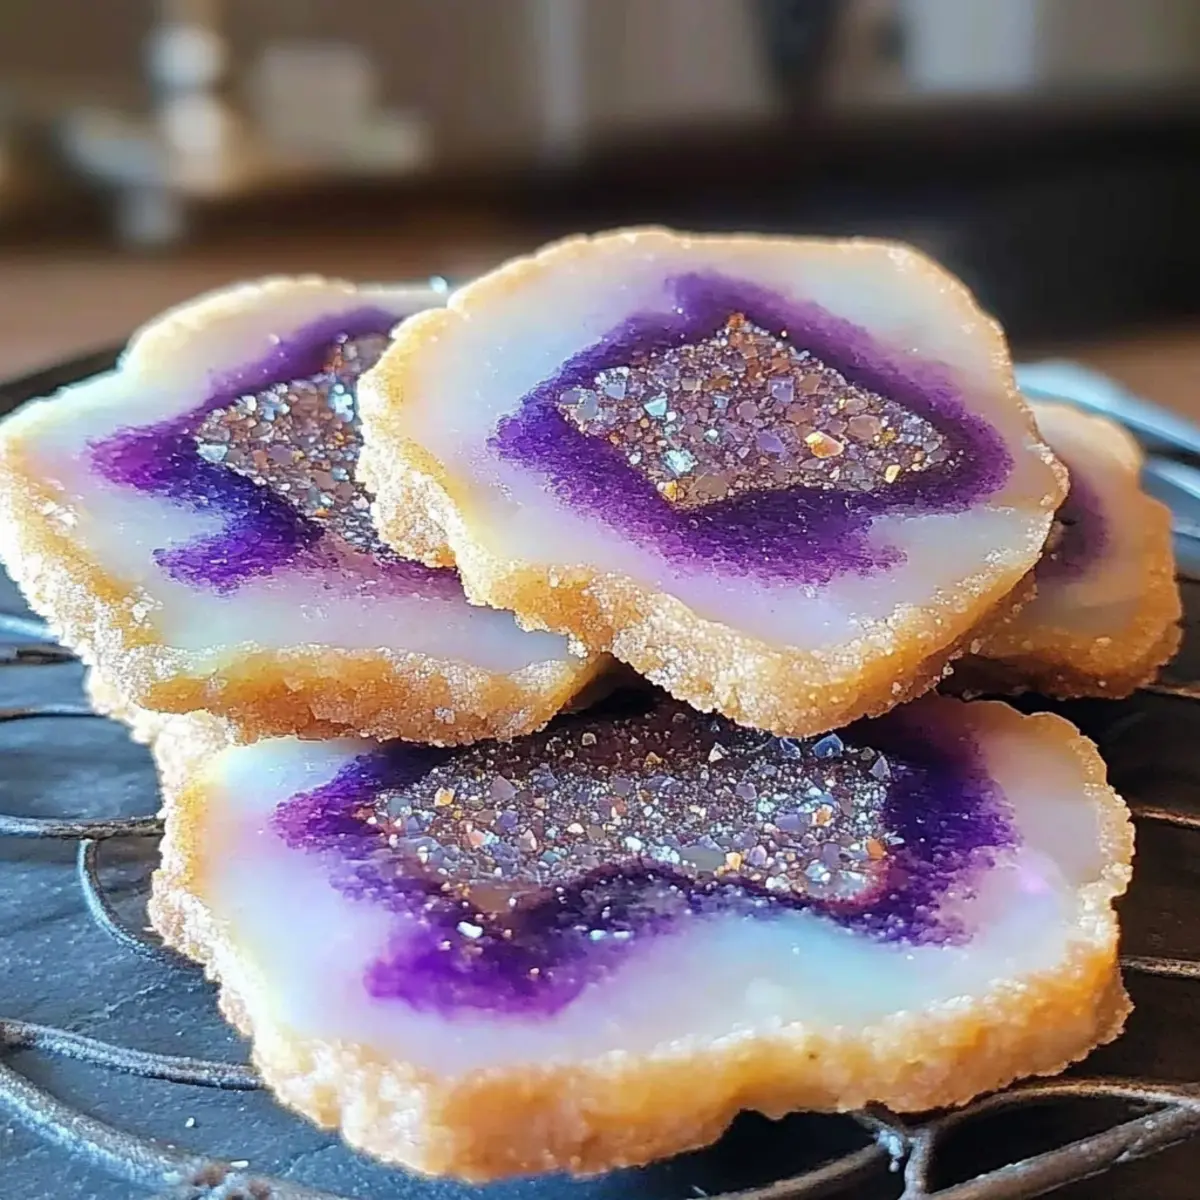
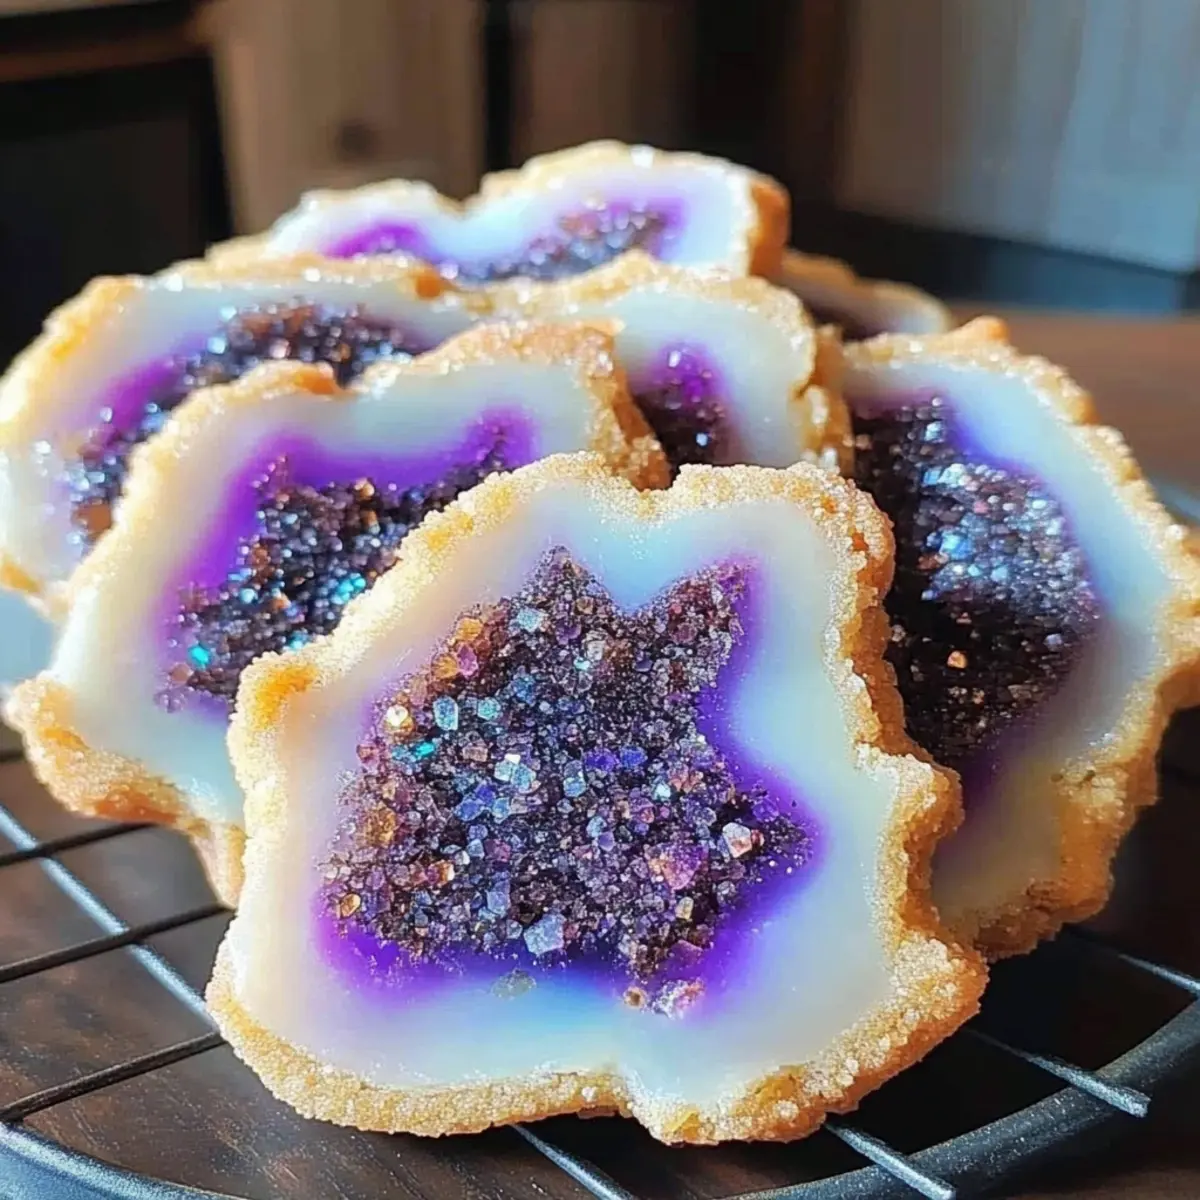
There’s nothing quite like the excitement of a baking adventure that transforms ordinary ingredients into a dazzling dessert! These Geode Cookies, with their colorful candy crystal decorations, offer an enchanting twist that will wow your friends and family. Not only are they a feast for the eyes, but the chewy texture and delightful crunch make each bite unforgettable. With quick prep and the ability to customize the colors to fit any festive occasion, you’ll have a fun project that brings joy to every gathering—or cozy night in! Ready to discover the magic of turning simple cookie dough into stunning bites of art? Let’s jump into this delicious journey together!
Why Are Geode Cookies So Special?
Enchanting Appearance: With their vibrant candy crystals sparkling like real geodes, these cookies are a visual feast that will impress any guest.
Chewy Delight: The soft, chewy base paired with the crunchy candy texture creates a delightful contrast in every bite, making them completely addictive!
Customizable Colors: Tailor the colors of the candy crystals for any occasion—from festive parties to cozy movie nights, these cookies can fit any theme!
Quick and Easy: With a straightforward preparation process, you’ll be in and out of the kitchen in no time, ready to share these gems with loved ones.
Perfect for Sharing: Whether it’s a birthday party or a simple gathering, these cookies are sure to be a hit and draw compliments from everyone!
Fun Family Activity: Baking these cookies is not only delicious but also an exciting way to spend time with family, ensuring memories and tasty treats are made together.
Geode Cookies Ingredients
For the Cookie Base
• All-Purpose Flour – Provides structure to the cookies; for a gluten-free version, substitute with a gluten-free flour blend.
• Baking Soda – Acts as a leavening agent, giving cookies a light and airy texture.
• Granulated Sugar – Adds sweetness and influences texture; feel free to reduce it for a less sweet cookie.
• Brown Sugar – Contributes moisture and a rich flavor; coconut sugar works well as a substitute for a caramel-like taste.
• Unsalted Butter – Adds richness and enhances flavor; can be replaced with vegan butter for a dairy-free alternative.
• Eggs – Binds the ingredients together while adding moisture; flax eggs are a great option for a vegan version.
• Vanilla Extract – Enhances the overall flavor; consider swapping with almond extract for a different essence.
For the Crystal Decoration
• Candy Crystals/Rock Candy – Offers the striking geode appearance as well as sweetness; if unavailable, use colored hard candies for similar effects.
These Geode Cookies are not just a treat; they’re a colorful celebration of flavor and fun!
Step‑by‑Step Instructions for Geode Cookies
Step 1: Preheat the Oven
Start by preheating your oven to 350°F (175°C). As it warms up, line two baking sheets with parchment paper to prevent sticking and ensure easier clean-up later on. This initial step sets the stage for baking those delightful Geode Cookies once your dough is ready!
Step 2: Mix the Dry Ingredients
In a medium-sized mixing bowl, whisk together 2 ½ cups of all-purpose flour and 1 teaspoon of baking soda. Ensure there are no lumps; this mixture provides the cookies with structure. Once combined, set the bowl aside as you gear up for the next steps in making your delicious Geode Cookies.
Step 3: Cream the Butter and Sugars
In a large mixing bowl, use a hand mixer or stand mixer to beat ¾ cup of softened unsalted butter with ½ cup of granulated sugar and ¾ cup of brown sugar. Mix on medium speed until the mixture becomes light and fluffy, roughly 2-3 minutes. This creamy base will add richness to your Geode Cookies, enhancing their overall flavor and texture.
Step 4: Incorporate Eggs and Vanilla
Add 2 large eggs to the butter and sugar mixture, one at a time, mixing well after each addition until fully incorporated. Next, blend in 2 teaspoons of vanilla extract. This step infuses your dough with a delicious aroma and flavor, making your Geode Cookies truly special.
Step 5: Combine the Mixtures
Gradually add the dry flour mixture into the wet ingredients. Mix on low speed until just combined; avoid overmixing to keep your cookies soft and chewy. The dough should be slightly sticky but well blended, ready to bring the vibrant Geode Cookies to life with the next addition.
Step 6: Fold in the Candy Crystals
Gently fold in 1 cup of candy crystals or rock candy into the dough using a rubber spatula. This is the magic moment when the colorful crunch gets mixed in, creating the signature geode effect. Make sure the candy pieces are evenly distributed to highlight the cookies’ enchanting appearance.
Step 7: Scoop and Bake
Using a cookie scoop or tablespoon, drop spoonfuls of dough onto the prepared baking sheets, spacing them about 2 inches apart. Bake in the preheated oven for 10-12 minutes, or until the edges turn golden while the centers remain soft. The aroma will fill your kitchen, signaling that these Geode Cookies are almost ready!
Step 8: Cool the Cookies
Once baked, let the cookies cool on the baking sheets for about 5 minutes. Then, gently transfer them to wire racks to cool completely. This cooling period is crucial for the Geode Cookies to set perfectly while maintaining their chewy texture, making them ready to be savored!
Expert Tips for Perfect Geode Cookies
- Avoid Overmixing: Mix your dough until just combined. Overmixing can lead to tough cookies, ruining the chewy nature of these delightful Geode Cookies.
- Watch Your Baking Time: Remove cookies from the oven when the edges are golden but the centers look soft. This will ensure they remain chewy, a key to their deliciousness!
- Colorful Creations: Don’t hesitate to experiment with different candy crystal colors. This tip allows you to match your Geode Cookies to any festive theme or occasion!
- Chill for Better Dough: If your dough is too soft to hold its shape, refrigerate it for about 30 minutes before baking. This extra step can help maintain the cookie structure.
- Cooling Essentials: Ensure you cool the cookies properly on a wire rack. This prevents them from steaming and helps keep that perfect chewy texture!
How to Store and Freeze Geode Cookies
Room Temperature: Store cookies in an airtight container at room temperature for up to 5 days. This keeps them fresh while maintaining their chewy texture.
Freezer: For longer storage, freeze the cookies for up to 3 months. Place them in a single layer in a freezer-safe bag or container to prevent sticking.
Thawing: To enjoy your frozen Geode Cookies, simply take them out and let them thaw at room temperature for about 30 minutes before devouring.
Reheating: If you prefer warm cookies, reheat in a preheated oven at 350°F (175°C) for 5-7 minutes to restore their delightful chewiness.
What to Serve with Geode Cookies
Brighten your gatherings with delightful pairings to complement these stunning treats!
- Milk: A classic! The rich creaminess washes down the sweet crunch wonderfully, creating a nostalgic experience.
- Vanilla Ice Cream: Serve a scoop alongside for a delightful contrast of warm and cold while amplifying the cookie’s sweetness.
- Decorated Cupcakes: Colorful cupcakes harmonize with the cookies’ vibrant look, making for a stunning dessert table.
- Fresh Berries: The tartness of strawberries or blueberries balances the sweetness, adding a refreshing element to the palette.
- Sparkling Lemonade: This zesty drink offers a refreshing twist that cuts through the sweetness, making each bite more enjoyable.
- Chocolate Dipping Sauce: Add a fun interactive element, allowing guests to dip bites of the cookie into warm chocolate for extra indulgence.
- Fruit Sorbet: Light and refreshing, sorbet complements the crunchy texture while providing a colorful complement to your sweet spread.
Together, these pairings will make your Geode Cookies shine even brighter during any special occasion!
Geode Cookies Variations & Substitutions
Unleash your creativity with these delightful twists on Geode Cookies that will tantalize your taste buds!
- Gluten-Free: Substitute all-purpose flour with a gluten-free flour blend to enjoy these cookies without gluten.
- Dairy-Free: Use vegan butter and flax eggs to create a delicious dairy-free version, perfect for those with dietary restrictions.
- Nuttier Flavor: Swap vanilla extract for almond extract for a delightful, nutty twist that enhances the overall flavor.
- Add Chocolate: Mix in mini chocolate chips for a sweet surprise, adding depth and richness to the chewy base.
- Colorful Sprinkles: Toss in colorful sprinkles alongside candy crystals for added fun and a festive touch, ensuring they stand out on any dessert table.
- Flavored Crystals: Replace traditional candy crystals with flavored hard candies to infuse exciting tastes, like raspberry or lemon, into your cookie creation.
- Citrus Burst: Add a teaspoon of lemon or orange zest to the dough for a refreshing, citrusy brightness that perfectly complements the sweetness.
- Spicy Kick: Add a pinch of cayenne pepper or chili powder to create a surprising contrast between sweet and spicy flavors, elevating your cookie experience!
These variations give you the freedom to explore while baking, so why not try a new twist? And if you’re in the mood for other cookie delights, don’t miss out on our scrumptious Cranberry Orange Cookies or the enchanting Chewy Pumpkin Cookies. Let the fun begin!
Make Ahead Options
These Geode Cookies are perfect for busy home cooks looking to save time on special occasions! You can prepare the dough up to 24 hours in advance by mixing it as instructed and then refrigerating it, ensuring to cover it tightly to prevent drying out. The candy crystals can also be folded into the dough ahead of time, but if you want to preserve their crunch, consider incorporating them just before baking. When you’re ready to bake, simply scoop the chilled dough onto baking sheets and pop them in the oven. You’ll enjoy freshly baked cookies with minimal effort, keeping their delightful chewiness and vibrant colors just as stunning!
Geode Cookies Recipe FAQs
What type of candy crystals should I use for Geode Cookies?
For the signature geode appearance, I recommend using colorful candy crystals or rock candy. If you can’t find them, feel free to use colored hard candies for a similar effect. They should be chopped into smaller pieces so they can integrate smoothly into the dough.
How should I store Geode Cookies to keep them fresh?
Absolutely! Store your cookies in an airtight container at room temperature for up to 5 days. This method preserves their delightful chewiness. Just make sure to keep them in a cool, dry spot to avoid any moisture.
Can I freeze Geode Cookies, and if so, how?
Yes, you can! To freeze your Geode Cookies, place them in a single layer in a freezer-safe bag or container, making sure they don’t stick together. You can freeze them for up to 3 months. When you’re ready to enjoy them, let them thaw at room temperature for about 30 minutes.
What should I do if my cookie dough is too soft?
If your dough is too soft to scoop, refrigerate it for about 30 minutes. This simple step firms up the dough, making it easier to work with and helping the cookies retain their shape during baking. Just remember, a little chilling can work wonders!
Can I make Geode Cookies vegan?
Certainly! To make these cookies vegan, substitute the eggs with flax eggs (1 tablespoon of ground flaxseed mixed with 2.5 tablespoons of water for each egg), and use vegan butter in place of the regular unsalted butter. These substitutions will still yield deliciously chewy cookies!
Will these cookies be safe for pets?
I recommend keeping these Geode Cookies away from pets, especially if they contain chocolate or certain nuts, which can be harmful to animals. Always check the ingredients before sharing any baked goods with furry friends!
Geode Cookies: Colorful Crunch for Sweet Moments
Ingredients
Equipment
Method
- Preheat your oven to 350°F (175°C) and line two baking sheets with parchment paper.
- In a medium bowl, whisk together the flour and baking soda until well combined.
- In a large bowl, cream the butter with granulated sugar and brown sugar until light and fluffy.
- Add the eggs one at a time and mix well, then add the vanilla extract.
- Gradually mix the dry ingredients into the wet ingredients until just combined.
- Fold in the candy crystals gently until evenly distributed.
- Drop spoonfuls of dough onto the baking sheets and bake for 10-12 minutes.
- Let the cookies cool on the baking sheets for 5 minutes before transferring to wire racks to cool completely.
Leave a Reply